2

Why does my object have different shades of grey on faces in Object Mode? It also looks and glitches when I export it to Roblox studio, and the different shades are still there even with a material or texture. I'm relatively new to Blender. How do I resolve this?

Object Mode:

enter image description here

Wireframe Mode:

enter image description here

original:

updated with edits:

Kiko
  • 23
  • 3
  • are all of the points of these three faces coplanar? – L0Lock Aug 30 '23 at 00:29
  • Hello and welcome to BSE! can you share your blend file https://blend-exchange.com – Harry McKenzie Aug 30 '23 at 00:56
  • Idk what co-planar means, ill look into it – Kiko Aug 30 '23 at 01:29
  • Hi. Please don't post essential information like links, file downloads or additional details in the comments section where it can be easily missed. Instead edit them into your original post with the [Edit] button above. Comments are transitory by nature, are hard to index or search for, and may be erased at any moment. – Duarte Farrajota Ramos Aug 30 '23 at 05:33

2 Answers2

1

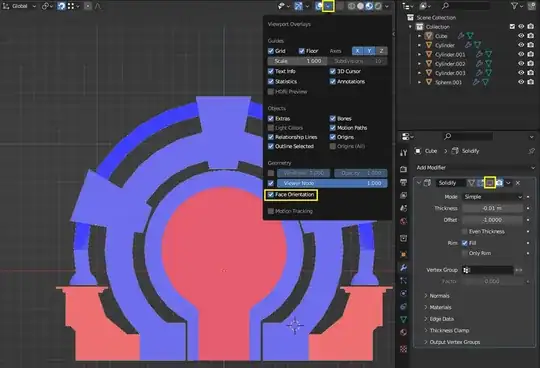
To see the problem, you have to enable Face Orientation under Viewport Overlays and temporarily disable the Solidify Modifier by disabling that monitor icon. Notice that you have inverted Face Normals as displayed as red faces. Fix them first by selecting all objects and then going into Edit Mode with tab then press A to select all faces and then go to menu Mesh > Normals > Recalculate Outside or use shortcut Shift+N. Also also while all faces are selected press M > Merge By Distance to remove 5 duplicate overlapping vertices.

enter image description here

And then fix this non-manifold geometry by either deleting the internal faces marked with a red X. And the face between and above the faces marked with a yellow X. And then fill the missing face. Then again recalculate normals with Shift+N.

enter image description here

Then lastly remove the Mirror Modifier for Cylinder.002, which you don't need, because it is causing the whole arch to overlap with the original. Or delete the other half of it before mirroring.

Harry McKenzie
  • 10,995
  • 8
  • 23
  • 51
  • Thank you so much, i followed all the steps and its much better, the shading is better excpet for one square and a corner here: https://imgur.com/a/0QF94JK

    i will post the updated blend file in the post

    – Kiko Aug 30 '23 at 15:24
1

To add to Harry McKenzie's answer, after you have recalculated the normals, you need to flatten the faces. Select them all with ShiftG (Select Similar) > Normal and flatten with SY0, it will fix the shading problem:

enter image description here

moonboots
  • 155,560
  • 7
  • 105
  • 171