1

I'm working on a (fun but needlessly complex) mockup for my wife's work. The idea I've had is that I can use my PBR cardboard texture along with the 2d image that will effectively define the boundaries of the plane.

Here is what it currently looks like in the Shader: The Material

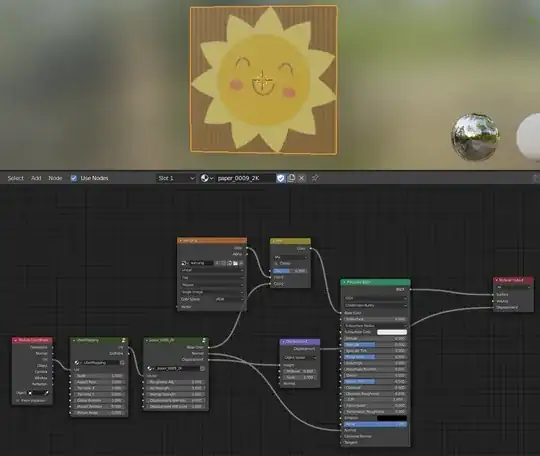
Using my more familiar 2d parlance, I just want to mask the eges out, so the cardboard texture is alpha'd wherever there isn't a pixel, thereby creating edges (which I can hopefully solidify to give depth).

Additional Thoughts:

  • I have been pointed toward the Mask Node, but that's relegated to the compositor, not the shader.
  • Regardless of what tack I take, I realize that I need a lot of subdivisions to support the geometry.
  • I also realize I could do this manually, but I'd prefer to figure out the proper way to generate whatever assets I might want.

Solution or no, thanks for your attention. Blender is super fun. And frustrating. And then fun again. And then infuriating. Then you feel like a god. Then I take a week off and forget half the terms. Blender is a mixed bag. Also life.

DocBadwrench
  • 724
  • 1
  • 9
  • 26
  • Here is a thread from ten years ago: How can I make what looks like a cardboard cutout of a person - But ten years ago might as well be 100 given how fast Blender changes... – DocBadwrench Jul 27 '20 at 22:28
  • Off topic: I just love the poetic ending :). That's how I felt the first few weeks of using blender. – jachym michal Jul 27 '20 at 22:37
  • 2
    Hello :). To fake it, just plug the Alpha channel of your texture, into the Alpha input of Principled BSDF shader. If you want actual geometry, you can import the illustration as an .svg and simply extrude it. – jachym michal Jul 27 '20 at 22:52
  • Thanks. I tried doing that, but the alpha area has turned black rather than clear. – DocBadwrench Jul 27 '20 at 23:43
  • Follow-up: Works in Cycles. I now have a paper-thin cardboard item that omits areas outside the texture area. THANK YOU Jachym. Now, I need to figure out if I can make it have thickness. But that's a separate thread.. – DocBadwrench Jul 27 '20 at 23:54
  • 1
    Read @RichSedman 's answers to similar (possible duplicate) qustions: https://blender.stackexchange.com/questions/40997/how-can-i-make-a-hexagonal-grill/78003#78003 and https://blender.stackexchange.com/questions/84129/is-there-a-way-to-add-fake-thickness-to-an-alpha-image-texture – susu Jul 28 '20 at 04:30
  • 1
    If you use alpha to give transparency I'm not sure you'll be able to give it thickness, what you need to do is using your image as a background, drawing a mesh that will have the exact same shape as your star and give it your image as Image Texture – moonboots Jul 28 '20 at 05:09
  • @susu Nice refs, I've always admired those, but far easier to import as geometry, and better results, in ordinary circumstances. – Robin Betts Jul 28 '20 at 06:04

1 Answers1

6

If you use alpha to give transparency I'm not sure you'll be able to give it thickness properly.

What you need to do is use your image as a background, draw a mesh that will have the exact same shape as your star, extrude, unwrap and give it your image as Image Texture.

Or import the shape as svg, make it a mesh, use X > Limited Dissolve to lighten the topology, and same thing, extrude, unwrap and give it the image as Image Texture. In your case the good news is that you won't need to rework the imported SVG.

enter image description here enter image description here

moonboots
  • 155,560
  • 7
  • 105
  • 171
  • Thanks. That's definitely a solution (and accepted as such), but my aim was the create a workflow that didn't require me to draw out a mess of points because that takes too long. Jachym has a good hack-together answer, but my actual solution can be found in this other thread: https://blender.stackexchange.com/questions/188050/how-do-i-add-thickness-to-my-cardboard-cut-out-image-as-plane – DocBadwrench Jul 29 '20 at 15:54
  • yes it looks like it's what I'm talking about (importing SVG)? It works as well... – moonboots Jul 29 '20 at 16:10
  • Not only that, it's clearly superior because you are building the geometry from Blender's pen rather than the import. I was just hoping there would be a little faster pipeline (some of my items have crazy edges). Thanks again! – DocBadwrench Jul 29 '20 at 16:13
  • from Blender's pen? what do you mean? – moonboots Jul 29 '20 at 16:18
  • Sorry, I'm just using my imprecise 2D terms. – DocBadwrench Jul 29 '20 at 16:47
  • oh ok I understand, yes it really depends on the situation, an SVG import should be the best way in your case, but sometimes you need a clean mesh and it's not always the case with imported SVG ;) for some purposes it needs to be clean and needs a lot of rework – moonboots Jul 29 '20 at 16:54
  • You are being so charitable. :) The default import of SVG's is sooo bad right now. But blender continues to evolve at what feels like lightspeed, so who knows.. – DocBadwrench Jul 29 '20 at 19:21
  • well actually in your case you just need to make a X > Limited Dissolve – moonboots Jul 29 '20 at 19:24
  • OH MY GOD. Did you just solve this with an offhanded comment long after i gave up? I just did that and I have regular geometry. – DocBadwrench Jul 29 '20 at 19:27
  • Also: I did that, and have regular geometry, but now I appear to have that 'duplicate face' problem... – DocBadwrench Jul 29 '20 at 19:28
  • ah ah ok I can't guess what you already know or don't know, yes dissolve will lighten your file, and in your case you can leave the mesh like that, it won't be enough in other cases – moonboots Jul 29 '20 at 19:29
  • after dissolve you may need to draw some inner edges to bring some corrections (with J to join or with the knife tool) – moonboots Jul 29 '20 at 19:33
  • Okay, here's what I did: I executed that X - Limited Dissolve, but then I was still left with weird 'duplicate faces' problem. So I went into Edit Mode, Chose the (3) Face Select tool, then excuted X - Delete Only Faces and am left with a proper, smooth, flat, SVG geometry. I will practice more and figure this out (and then share). Thanks so much! I'm relatively new (last 4 mos) but there's soooo much to learn. – DocBadwrench Jul 29 '20 at 19:40
  • not sure about the weird faces you're talking about, what you can do is share your svg so that we check the best way to do it – moonboots Jul 29 '20 at 19:45
  • There's just a 'shimmering' but no worries! It doesn't matter. I'm going to execute this workflow on a different piece of artwork. If it works, I'll post an update. :) – DocBadwrench Jul 29 '20 at 19:51