0

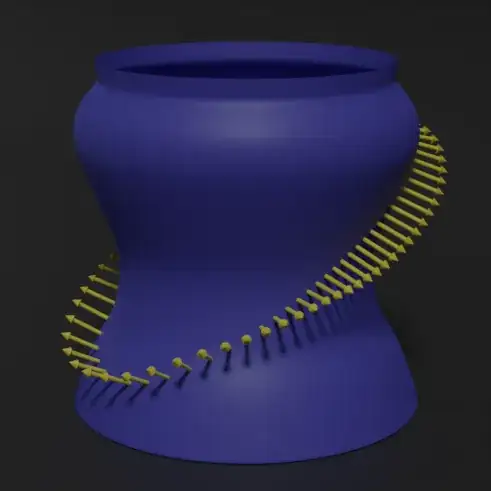
I am quite new to Blender and I am trying to have arrows following a path snapped onto a surface. The arrows' direction must be normal to the surface. I tried so many different things, array + curves, particle etc. I just cannot make it happen. I attach what the surface in blue I have and the path I want the arrows the follow. You can see how the final result would look like

surface+arrows+path.

How would you procede?

Any help would be so very welcome!

Thank you very much

m.ardito
  • 11,967
  • 2
  • 23
  • 36
Gael
  • 15
  • 4
  • "The arrows' direction must be normal to the surface" -> must it really be the normals or can it pretend to be? In the latter case, you can simply tilt the bezier's vertices (ctrl T or Tilt value in the N panel), or, if you've used a duplifaces as a support for your arrows, tilt the faces – moonboots May 24 '20 at 06:09
  • Script version here https://blender.stackexchange.com/questions/174727/place-objects-on-mesh-using-snap-with-python-script/175503?r=SearchResults&s=1|28.8014#175503 – batFINGER May 24 '20 at 08:29

2 Answers2

2

Unless I've misunderstood the question:

You could make cylinder (a ribbon) to shrinkwrap to the surface, and in its Object > Instancing panel, set its method to 'Faces'

Parent an appropriately oriented arrow-object to the ribbon, and Modifiers > Shrink-Wrap the ribbon to the surface by the projection method that best picks up the normals you're looking for.

enter image description here

You could even adjust the edges between the faces by hand, if you want finer control of the distribution of arrows. The ribbon does not have to be rendered, you can switch that off in the Instancing panel.

enter image description here

Robin Betts
  • 76,260
  • 8
  • 77
  • 190
  • 1
    That is amazing! Simple and exactly what I needed. I have another small question, I want my surface to be transparent, but the arrow is hidden in the center, how can I hide the arrow without hidding all of them? – Gael May 25 '20 at 04:16
  • 1
    Although the dupli-source arrow shows in the viewport, (even if the view is set to 'Rendered',) it does not appear in the final F12 render. If you need to hide it in the viewport as well, you can Obj Mode > M move it to another collection, and hide that collection from the viewport (toggling the Eye icon in the outliner). I've always found this logic a bit mysterious, myself.... – Robin Betts May 25 '20 at 06:18
  • Wrote a script to do exactly this, but baulked when trying on Suzanne (get a convex hull arrangement around the ears), Updated it to use the edges of bisect instead.. .. but is it worth posting it? (prob not) Good to see you. – batFINGER May 25 '20 at 09:09
  • 1
    I can see some situations where this answer wouldn't work that well, or at least be fiddly? You're replacing Shrinkwrap's raycasting with your own, or something? I for one would love to see how it's done. – Robin Betts May 25 '20 at 09:18
  • Thanks again Robin! By any chance, would you also know how to make the color gradient following the changes of curvature of this surface, but only for the changes of curvature along z? Like in the image I posted. – Gael May 26 '20 at 02:38
  • @Gael That's a good question, and a completely different one. The way SE sites are organised, you should post it as a new one. It will be better exposed to potential answers, and make a better archive. – Robin Betts May 26 '20 at 07:33
  • Thank you very much, I will. :) – Gael May 27 '20 at 03:41
  • And if I wanted to make these arrows move along that contour in an animation, would that trick remain the best option? – Gael May 27 '20 at 05:12
  • Pretty sure you could use a shrink-wrapped variation on this, using a Curve deform modifier, then a shrink, as shown .. If it works, great. If it doesn't, again, post where you got stuck as a new question. – Robin Betts May 27 '20 at 08:04
  • Thanks again Robin! – Gael Jun 01 '20 at 06:09
1

Add a circle a round the object you want.Add a shrink wrap modifier to the circle and set mode to project and check negative.Then add a particle system to the circle and set it's type hair and check advanced.Under emission set source to verts.Check rotation and set it to Normal.Then create an arrow mesh.Under render in the circle's particle system set render as object and set the object to your arrow mesh check check object rotation and uncheck object scale.Then edit your arrow mesh to point to the normal in edit mode.

link updated: https://drive.google.com/file/d/1DITVs9UplaVjc6pFR6hpl69-cRimdk25/view?usp=sharing

Bruk
  • 479
  • 2
  • 7