-5

i need help with making the 2d model into 2d eyes i need to know how to make 2d eyes, that are rounded slightly, I want them to be black with glowing white eyes, I want them to be looking like a glass screen. enter image description here

be sure to answer or tell me if its is even possible what im asking. thank you, enter image description here

JustImpact
  • 141
  • 1
  • 10

1 Answers1

3

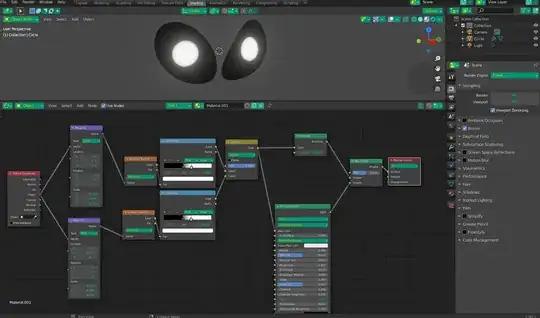
You can get glowing eyes by using a Spherical Gradient shaped further with a ColorRamp, and run through and Emission Shader. To get the "Pupils" in the right place, you will have to use individual Mapping Nodes for each, and position them manually (based on the shape/position of your mesh(s)). Since it's just black and white, you can get away with plugging the emission straight into the material output, but you said you wanted a "glass screen" (I take as shiny) surface, so in my example, I mixed it with the Principled BSDF with the Roughness set to 0. Don't forget to turn on Bloom.

GlowEyes

Christopher Bennett
  • 25,875
  • 2
  • 25
  • 56
  • i really appreciate this, thank you, i would like to ask if every step i have to do is on the image you sent?? also how do i get the lighten node? – JustImpact Jan 13 '21 at 20:51
  • You said you already made the eyes, so yeah, It should be. Like I said, the values in the Mapping Nodes may be different for you than me, and the ColorRamp sliders might need slightly different positions, but basically that's it. – Christopher Bennett Jan 13 '21 at 20:54
  • i got the black skinniness however the brightness isnt there along with the white pupils, have i done anything wrong? – JustImpact Jan 13 '21 at 21:42
  • Did you increase the emission strength and/or turn on bloom in the render properties panel? – Christopher Bennett Jan 13 '21 at 21:48
  • its the exact same as the image – JustImpact Jan 13 '21 at 21:49
  • Not syre then, it should be bright. Oh, I just saw you asked about the "Lighten" Node - it's actually a MixRBG node set to "lighten" ("add" works too as I'm just adding the two different pupils into one texture) – Christopher Bennett Jan 13 '21 at 22:06
  • yeah i managed to get the node but the rest isn't working even though it looks accurate to what you showed me, is there a way for me to show you the image of what i have done – JustImpact Jan 13 '21 at 22:21
  • My object is Y axis aligned, which is why I translated by 1.5 on the Y in the Mapping node. Your object is X axis aligned, so you should be altering the X axis of your mapping node. But remember, because our meshes aren't the same shape/size/orientation, etc... you can't expect the same values in the Mapping node to behave the same for your project as they do for mine (mine is 1.5, yours could be 2.5 or more (or less)). Play around with your X location values on the Mapping Node to see if you can make the "dot" appear. – Christopher Bennett Jan 13 '21 at 22:50
  • yeah its not appearing anywhere, is there a setting that im missing – JustImpact Jan 13 '21 at 23:37
  • good news mate everything is working fine when it come to nodes, i just need to fix the mesh itself, thx mate im honestly grateful for the help – JustImpact Jan 13 '21 at 23:47
  • ok so yours is curved just like my image, however mine is curved nd its not showing the pupil, ive used a flat pane and it works fine, but as soon as i curve the plane is gets small and or it gets lost – JustImpact Jan 14 '21 at 11:08
  • Let's put it this way - the "sphere" that makes up your eye dot is out there, floating in 3D space. You have to use the mapping node to bring it to a place where it intersects your plane - that is where you see the dot. Object texture coordinates puts 0,0,0 at the object's origin, so it shouldn't be far away. Just "search the axes" for the magic spot. – Christopher Bennett Jan 14 '21 at 14:23