5

enter image description here

enter image description here

HI!

I came across the model on sketchfab, which has beautiful fur rendered(the pic is from the artist's twitter, I don't have the model,so I don't know how it is achieved), however, I found it is not particle system but pure shader for the main body, with only a few plains with fur texture to make the longer hair more visible. does anyone know how to achieve such fur effect?

the link is another work from the author, a fur shaded sphere, which you can check out the first sphere effect dynamically and more clearly. it is a simple sphere, the shader samples the mesh surface several times and offset along normal direction, so in wireframe mode, it looks like the sphere is with multiple layers of mesh, but it has only one.

https://sketchfab.com/3d-models/fur-test-fb44288a935047fcb007b6def988c6c2

I have done some research, but couldn't find a way to implement this in blender.

the author also included the hint in below articles explaining the concept. https://xbdev.net/directx3dx/specialX/Fur/

however, I dont think blender gave us access to mess with the built_in_shader's vertex shader. and could not find a way to realize this with nodes, or maybe I missed something.

anyone can shed me some light on this one? thank you!
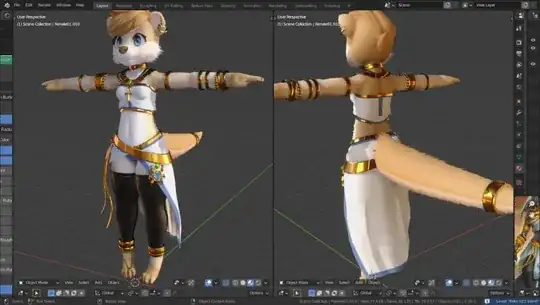
alex
  • 51
  • 1
  • 3
  • Have you seen this? https://blenderartists.org/t/shell-texturing-geometry-shader-multiple-examples/638957 – vklidu Sep 13 '21 at 19:00
  • OK I found author on Twitter ... The best way - ask directly to him to explain workflow ... So he can answer directly here ;) – vklidu Sep 13 '21 at 22:20

1 Answers1

8

Link to fur sphere (sketchfab) seems to be the same technique like on the screens - planes with hair shader ... like in this test:

Model

  • Sphere with default UVmap
  • Extrude as Individuals and for newly Extruded vertices Assign VertexGroup
  • Delete top Faces, Select vertex Group (top vertices) and Rotate them
  • To break a grid you can Randomize vertices a bit
  • I used Subdivision Modifier here

Shader

  • Color comes from default UVmap
  • For Transparency texture add a new UVmap slot
  • Select all vertices and U > Reset

enter image description here

Note:
You would have to increase Light Path > Max Bounces > Transparency to eliminate blacks in fur.


Shell Texturing

Your second link is referring to "shell texturing" that I haven't seen before, but here is some test written in python for blender 2.79 ... so you would need to find someone with python skills to write something like that for 2.9x if you want to go that way ... or you can check this normal offset technique here if it will inspire you somehow.

vklidu
  • 36,165
  • 1
  • 61
  • 135
  • thank you for your time to look into this! – alex Sep 13 '21 at 02:16
  • The pic is from the artist's twitter, I don't have the models. If you check the words the artist left on the fur test scene, the sphere is just a simple sphere , the reason you see the complex vertex is completely made by the shader, not by modifying in edit mode. The mesh should stay simple for further animation. – alex Sep 13 '21 at 02:24
  • 1
    Here is an old tutorial Shell grass texture Blender 2.78 that uses 5 layers with different alpha values, kinda similar as described in "the second link". (I have not tried the tutorial in Blender 2.8+ and I have no idea how you would make fur for a humanoid model with this. ) – Blunder Sep 13 '21 at 19:21
  • @alex do you mean words in comment? Base mesh is a sphere ... the one in a middle, but ... The left sphere with short fur is several spheres scaled up to fake layering of shell texture. The rght sphere is extruded and rotated ... switch to wireframe view to see that. He is using combination of both on his characters. BTW I don't think sketchfab can use real shell texturing shader like Unity does. – vklidu Sep 13 '21 at 21:40