The title say's almost any thing idk what is the proper way to use these PBRs ?
i just don't know how to use these im trying to achieve to right result

- 348
- 2
- 14
-
1First of all I would suggest to set the Metallic slider to 1. – Gordon Brinkmann May 17 '22 at 12:55
-
1I can't easily read the titles of your images, but for the glossiness map, change the color space to non-color data (currently sRGB) and then subtract it from 1 using a math node. Connect the output of the math node to the Roughness input of the BSDF. – Christopher Bennett May 17 '22 at 14:19
-
@GordonBrinkmann Believe me i did that it's not gonna be the same , thanks for your advice , i also uploaded those textures if anyone can make the final result – hamed.3d172 May 17 '22 at 14:21
-
@ChristopherBennett it is not just glossiness value or map there is ton of maps that idk how to use them inside blender – hamed.3d172 May 17 '22 at 14:22
-
Related: https://blender.stackexchange.com/a/174461/78972 – jachym michal May 17 '22 at 19:22
-
1@JachymMichal checked it out but the final result was clearly different in there too – hamed.3d172 May 17 '22 at 21:04
1 Answers
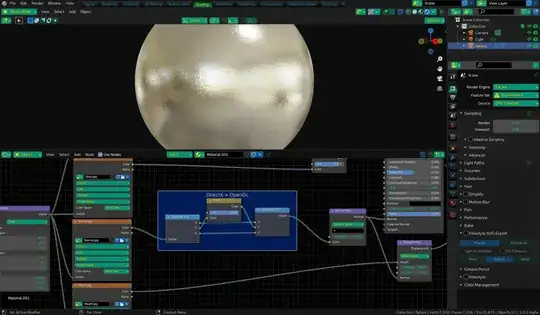
I would connect them like this - blender is set up best to use metal/rough workflow, but can accommodate a smoothness/glossiness workflow with some adaptations. The main modification in the graph below is the subtraction of the Gloss map from 1 to make it "familiar" to a roughness input (as roughness is essentially inverted gloss). The reflection map can be omitted - As far as I can tell, it's responsible for some kind of specular tint, which blender usually provides VIA a metallic factor - so if the object is meant to be metallic, set it to 1 (pictured below), else, leave it at 0.
All maps except subusurface color, basecolor and emission should be set to Non-Color Data. Normal map textures must be run through a normal map node, and Height textures must be run through the height input of a displacement node (or bump node in the absence of a Normal Map).
EDIT - another (less conventional but functional) way of setting this up is to omit the Diffuse texture alltogether. Then, use the Reflective map as both the Basecolor and Specular Tint (the second barely makes a difference, but there is a difference nontheless). The mapping node has the scale set to be 4x4 because it seems to match your reference photo better.
NOTE - Based on the types of texture maps associated with this material, I'm guessing it was made in VRAY (or some other similar raytrace engine). Regardless, if want to see it as close to the original as possible, you must use Cycles (not EEVEE). Even still, it may not be perfectly identical to the VRAY render.
Additionally, since I believe this material may have been made in a VRAY based editor, it is possible that the Normal Map was made for DirectX based renderers, where Blender uses OpenGL. The method for converting a Normal map from DirectX to OpenGL is shown below.
Also remember that the look of the material is very much based on the HDRI being used. Since this looks best in Cycles, but blender uses a version of EEVEE for the Material tab, you can only view it correctly in Rendered Preview mode, using some HDRI you add yourself.
- 25,875
- 2
- 25
- 56
-
thanks for your effort but the result isn't true/same as the final render above im searching for a true look – hamed.3d172 May 17 '22 at 16:50
-
thanks for your effort but the result isn't true/same as the final render above im searching for a true look – hamed.3d172 May 17 '22 at 16:50
-
1
-
very thanks but this is still isn't what i wanted , i mean you should use all the maps including diffuse , i have received a 1tb texture pack , and they're all look the same isn't there a traditional way to truly use all these textures ? reflection map doesn't have color for all materials , i mean they all needed to be used . – hamed.3d172 May 17 '22 at 18:37


