I'd like to render flat and wireframe like this. How do I control render setting?
-
3Hi. Please use a title that matches the content of the question. It should be descriptive but succinct, unique and identifying, summarizing the issue in such way that anyone searching for a similar problem is likely to find it. Use the [edit] link above, remove anything superfluous, avoid words like "this", "help", "issue with" or "question about". Remember, your title is the first thing potential visitors see, answers you get depend heavily on how insightful it is. See What is the problem of asking “How do I do this?" – Duarte Farrajota Ramos Dec 07 '23 at 09:21
-
@DuarteFarrajotaRamos This is quite a simple question on how to create a certain shader and I've almost finished my answer. – Gordon Brinkmann Dec 07 '23 at 09:50
-
The keywords are 'wireframe' and 'shader'. You already have the 'wireframe' in the description but not in the title. If you search for it you will find several similar questions: https://blender.stackexchange.com/q/36701/107598 - https://blender.stackexchange.com/q/23616/107598 - https://blender.stackexchange.com/q/51802/107598 - https://blender.stackexchange.com/q/221321/107598 - https://blender.stackexchange.com/q/132556/107598 – Blunder Dec 07 '23 at 17:24
1 Answers
A relatively easy way is when you have a quite low-poly mesh with a Subdivision Surface modifier on it to smooth it out. And the faces of the object should be quads. I call it an easy way, but I'll take the time to explain it in detail.
At first, I'm using a simple plane to show the basic shader setup for a single quad face. A plane has a square face that by default completely fills the UV map. The UV map is 2-dimensional and goes from bottom left X, Y = (0, 0) to top right with X, Y = (1, 1), so in X it has a range of 0 to 1 and the same for Y.
Which means, if you take a Texture Coordinate node and then plug the UV output into a Separate XYZ node, the X values are a black to white gradient from left to right, and the Y values a black to white gradient from bottom to top, here showing the X values:
If you now plug the X values into a Math node set to Compare, leave the second value at 0.5 and the Epsilon (the tolerance in this case) to something between 0 and 0.5, you will get "true" (=1) for all values in the range of 0.5 - Epsilon to 0.5 + Epsilon and false (=0) outside this range. Here is an example with Epsilon = 0.45, the plane is now showing black borders to the left and right where the result is false, from 0 to 0.05 and 0.95 to 1. The rest is white:
When you do the same with the Y values, you get black borders on the bottom and top of the plane. Now you can combine both with a Math node set to either Minimum or Multiply (the result is the same) and you get a black border around the square (I also use a Value node for Epsilon to be able to adjust them both simultaneously):
If you use this as a mix factor for a Mix Color node, the black area will show the first color and the white area the second color. I'm using some kind of greenish and a dark grey and you probably already get an idea where this is going:
This is basically the material, to get some shading on it you just need to plug this color output into the Base Color of a Principled BSDF node, but I'll get to the rest later. The more important is now how to get this on any arbitrary model.
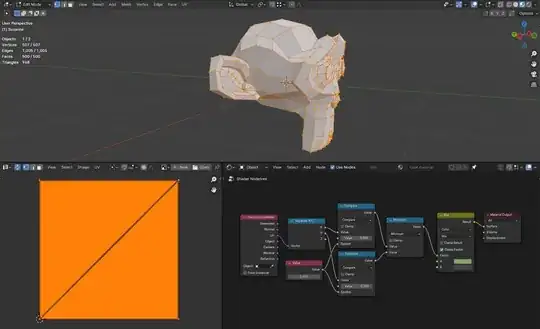
I'll take Suzanne as example. The mesh is mostly quads with some triangles, which is not ideal but sometimes it does not really show, depending on the actual mesh. If you go into Edit Mode you can see, Suzanne comes like most mesh primitives in Blender with a ready-to-use UV layout:
But this is not needed. Instead, select all faces with A, then you can either press U > Reset in the 3D Viewport or in the UV Editor menu choose UV > Reset. What this does is placing all faces individually on the UV map, each face normalized and using the complete map. Sounds complicated, but for each quad face this simply means, no matter what dimensions they have in the object, their UVs will be a regular 1×1 square. In the UV map they now all lie on top of each other (the diagonal lines come from the few triangles):
So when you now put the basic material created before on Suzanne, each face will become dark grey with a greenish border. It is not perfect though, because extreme size differences between the faces in the mesh will lead to varying line thicknesses, this method works best with meshes that have a mostly uniform resolution:
And adding a Subdivision Surface modifier now on the object smoothes out the low-poly edges of the base mesh (I've adjusted the Epsilon values to make the lines a bit thinner). Then I plug the color into Principled BSDF with a high Roughness value for the shading:
And this is it. For the background you can use a subdivided plane also with reset UVs and it is finished. You can also use this border separation for other settings like roughness, emission, metallic, bump if you want to make a slightly different material then the reference.
- 28,589
- 1
- 19
- 49


