I think, what you're after is something like this:
\documentclass[tikz, border=1cm]{standalone}
\begin{document}
\newcommand{\polygram}[4][]{
% options, radius, # of total points, # of skipping points
\draw[#1] (0:#2)
\foreach \x in {1,...,#3} {
-- ({360/#3(\x-1)#4}:#2)
} -- cycle
}
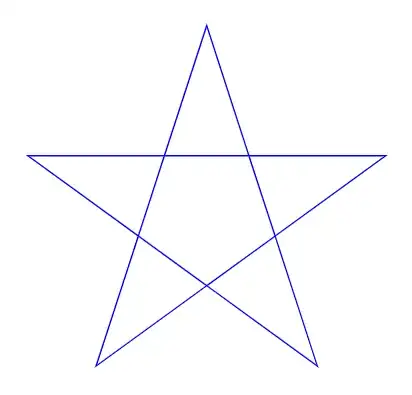
\tikz \polygram[blue]{2}{5}{2};
\end{document}

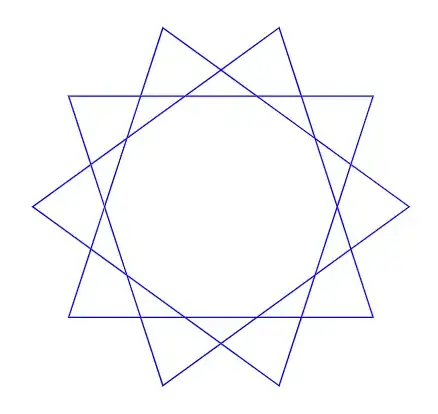
As comparison, \tikz \polygram[blue]{2}{10}{3}; yields:
Note that 0 degees is to the right. In order to draw the diagram with its starting point upwards, you need to turn everything by 90 degrees counterclockwise:
\documentclass[tikz, border=1cm]{standalone}
\begin{document}
\newcommand{\polygram}[4][]{
    % options, radius, # of total points, # of skipping points
    \draw[#1] (90:#2)
    \foreach \x in {1,...,#3} {
        -- ({360/#3(\x-1)#4+90}:#2)
    } -- cycle
}
\tikz \polygram[blue]{2}{5}{2};
\end{document}
And because I recently got to like pics so much, a solution using a pic:
\documentclass[tikz, border=1cm]{standalone}
\begin{document}
\tikzset{
    pics/polygram/.style={
        code={
            \tikzset{polygram/.cd, #1}
            \draw[pic actions] (90:{\pgfkeysvalueof{/tikz/polygram/radius}})
                \foreach \x in {1,...,{\pgfkeysvalueof{/tikz/polygram/total points}}} {
                    -- ({ 360 /
                          \pgfkeysvalueof{/tikz/polygram/total points} *
                          (\x - 1) *
                          \pgfkeysvalueof{/tikz/polygram/skipping points} +
                          90 } :
                        {\pgfkeysvalueof{/tikz/polygram/radius}})
                } -- cycle;

        }
    },
    polygram/.cd,
    radius/.initial=1,
    total points/.initial=5,
    skipping points/.initial=2,
}
\tikz \pic[blue] {polygram={radius=2}};
\tikz \pic[red, thick] {polygram={total points=7}};
\tikz \pic[cyan, dashed] {polygram={radius=2, total points=7, skipping points=3}};
\end{document}

This version also works with p (total number of points) and q (number of points skipped) that are evenly divisible:
\documentclass[tikz, border=1cm]{standalone}
\begin{document}
\tikzset{
pics/polygram/.style={
code={
\tikzset{polygram/.cd, #1}
\pgfmathparse{
mod(
\pgfkeysvalueof{/tikz/polygram/total points} ,
\pgfkeysvalueof{/tikz/polygram/skipping points}
) == 0 ? \pgfkeysvalueof{/tikz/polygram/skipping points} : 1
}
\foreach \r in {0,...,\pgfmathresult} {
\begin{scope}[rotate={360/\pgfkeysvalueof{/tikz/polygram/total points}\r}]
\draw[pic actions] (90:{\pgfkeysvalueof{/tikz/polygram/radius}})
\foreach \x in {1,...,{\pgfkeysvalueof{/tikz/polygram/total points}}} {
-- ({ 360 /
\pgfkeysvalueof{/tikz/polygram/total points}
(\x - 1) *
\pgfkeysvalueof{/tikz/polygram/skipping points} +
90 } :
{\pgfkeysvalueof{/tikz/polygram/radius}})
} -- cycle;
\end{scope}
}
}
},
polygram/.cd,
radius/.initial=1,
total points/.initial=5,
skipping points/.initial=2,
}
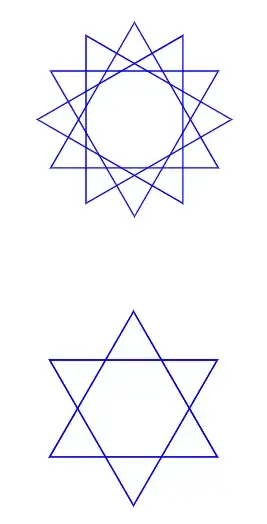
\tikz \pic[blue] {polygram={total points=12, skipping points=4}};
\tikz \pic[blue] {polygram={total points=6, skipping points=2}};
\end{document}
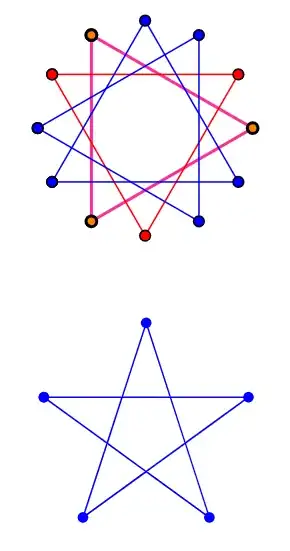
An adjustment to be able to style the different layers individually and to add stylable dots at the tips:
\documentclass[tikz, border=1cm]{standalone}
\begin{document}
\tikzset{
    pics/polygram/.style={
        code={
            \tikzset{polygram/.cd, #1}
            \pgfmathsetmacro{\polygramlayers}{
                mod(
                    \pgfkeysvalueof{/tikz/polygram/total points} ,
                    \pgfkeysvalueof{/tikz/polygram/skipping points}
                ) == 0 ? \pgfkeysvalueof{/tikz/polygram/skipping points} : 1
            }
            \pgfmathsetmacro{\polygramnodesperlayer}{
                int(
                    \pgfkeysvalueof{/tikz/polygram/total points} /
                    \polygramlayers
                )
            }
            \foreach \r in {1,...,\polygramlayers} {
                \tikzset{polygram layer \r/.initial={}}
                \begin{scope}[
                    rotate={360/\pgfkeysvalueof{/tikz/polygram/total points}\r},
                    pic actions,
                    polygram layer \r
                ]
                    \draw (90:{\pgfkeysvalueof{/tikz/polygram/radius}})
                            node[polygram dot] {}

                        \foreach \x in {1,...,\polygramnodesperlayer} {
                            -- ({ 360 /
                                  \pgfkeysvalueof{/tikz/polygram/total points}
                                  (\x - 1) *
                                  \pgfkeysvalueof{/tikz/polygram/skipping points} +
                                  90 } :
                                {\pgfkeysvalueof{/tikz/polygram/radius}})
                                    node[polygram dot] {}
                        } -- cycle;
                \end{scope}
            }
        }
    },
    polygram dot/.style={circle, fill, inner sep=1pt},
    polygram/.cd,
    radius/.initial=1,
    total points/.initial=5,
    skipping points/.initial=2,
}
\tikz
    \pic[blue,
        polygram dot/.append style={draw=black},
        polygram layer 1/.style={magenta, thick, polygram dot/.append style={fill=orange}},
        polygram layer 2/.style={red}
    ]
    {polygram={total points=12, skipping points=4}};
\tikz
    \pic[blue] {polygram={total points=5, skipping points=3}};
\end{document}
A non-pic version of the last variant would be:
\documentclass[tikz, border=1cm]{standalone}
\begin{document}
\tikzset{
    polygram dot/.style={circle, fill, inner sep=1pt}
}
\newcommand{\polygram}[4][]{
    % options, radius, # of total points, # of skipping points
    \pgfmathsetmacro{\polygramlayers}{
        mod(#3,#4) == 0 ? #4 : 1
    }
    \pgfmathsetmacro{\polygramnodesperlayer}{
        int(#3/\polygramlayers)
    }
    \node at (0,0) {\polygramlayers};
    \foreach \r in {0,...,\polygramlayers} {
        \tikzset{polygram layer \r/.initial={}}
        \begin{scope}[rotate={360/#3 * \r}, #1, polygram layer \r]
            \draw (90:{#2}) node[polygram dot] {}

                \foreach \x in {1,...,\polygramnodesperlayer} {
                    -- ({360/#3 * (\x - 1) * #4 + 90}:{#2}) node[polygram dot] {}
                } -- cycle;
        \end{scope}
    }
}
\tikz \polygram[blue]{1}{5}{2};
\tikz \polygram[blue, polygram layer 1/.style={red}]{1}{12}{4};
\end{document}


--without a coordinate after it, move it outside the loop. Besides @hpekristiansen's link, the coordinate in the loop has a)too many. It should be at least({360/(\x+#3)}:#1). – Qrrbrbirlbel Dec 20 '22 at 16:00