0

I'm attempting to create a block diagram, but I'm facing challenges with the placement of arrows. Additionally, I'm unsure about how to incorporate this triggering block. Can someone help me how to draw this with \arrows?

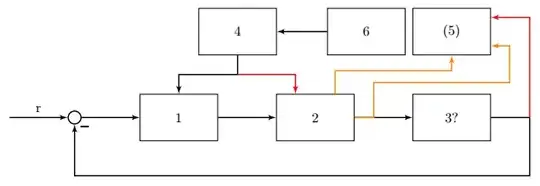
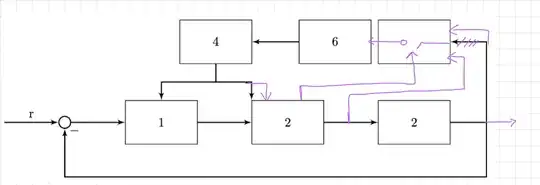
I want this: enter image description here

What I have

\documentclass[border=0.2cm]{standalone}

% More defined colors \usepackage[dvipsnames]{xcolor}

% Required package \usepackage{tikz}

\usetikzlibrary{arrows,shapes,backgrounds,patterns,fadings,matrix,arrows,calc, intersections,decorations.markings, positioning,external,arrows.meta} \tikzset{ block/.style = {draw, rectangle, minimum height=1cm, minimum width=2cm}, input/.style = {coordinate,node distance=1cm}, output/.style = {coordinate,node distance=6cm}, arrow/.style={draw, -latex,node distance=2cm}, pinstyle/.style = {pin edge={latex-, black,node distance=2cm}}, sum/.style = {draw, circle, node distance=1cm}, }

\begin{document}

\begin{tikzpicture}[auto, node distance=0.5cm,>=latex', scale=0.8, transform shape] 
\node [input, name=input] {};
\node [sum, right=1.5cm of input, line width=0.25mm,] (sum) {};

\node [draw=black,
minimum width=2cm,
minimum height=1.2cm,
right=1.5cm of sum]   (1) {1};
\node [draw=black,
minimum width=2cm,
minimum height=1.2cm,
right=1.5cm of 1]  (2) {2};        

\node [draw=black,
minimum width=2cm,
minimum height=1.2cm,
right=1.5cm of 2]  (3){2};    

\node [draw=black,
minimum width=2cm,
minimum height=1.2cm,
above right =1cm and -0.5cm of 1]  (4){4};   

\node [draw=black,
minimum width=2cm,
minimum height=1.2cm,
right =1.3cm of 4]  (6){6};   

\node [draw=black,
minimum width=2cm,
minimum height=1.2cm,
above = 1cm of 3]  (5){};   

\node [minimum width=1mm,
line width=0.25mm,
minimum height=1.4cm, output, right=1 cm of 3] (y) {};

\draw [draw,->, line width=0.25mm] (input) -- node {r} (sum);
\draw [->,line width=0.25mm] (sum) -- (1);
\draw [->,line width=0.25mm] (1) -- (2);
\draw [->,line width=0.25mm] (2) -- (3);
\draw [line width=0.25mm] (3) --  (y);
\draw [->,line width=0.25mm] (6.west) --(4.east);
\draw [->, line width=0.25mm] (y) -- ++ (0,-1.5) -| node [pos=0.98, right] {$-$} (sum.south);
\draw[line width=0.25mm,->] (4.south) -- ++ (0,-0.5) -|   (1.north); 

\draw[line width=0.25mm,->] (4.south)+(0,-0.5) -|  (2.north west); 
\draw [->,line width=0.25mm] (y)  |- node [pos=0.98, left] {} (5.east);

\end{tikzpicture}

\end{document}
Andersa
  • 53
  • 3
  • 2
    why you not use as starting point accepted answer on your previous question (https://tex.stackexchange.com/q/693601/)? To it you only need to insert desired switch. BTW, structure of switch seems to be illogical. Can you clarify what are their input and outputs, please? Maybe with sketch just of it? – Zarko Aug 21 '23 at 18:30
  • Because I would to have learn how to do with \draw, input is measurements and output from block with 2 (one in the middle), triggering is coming from block 2 and output is going to block 6 @Zarko – Andersa Aug 21 '23 at 18:42
  • 3
    Sorry, but this is not a good way to learn tikz. What you did, is just belittlement of people ant their efforts, who try to help you. For learning you can experiment with received code on own. – Zarko Aug 21 '23 at 19:39
  • 2
    In my answer (tex.stackexchange.com/q/693601) on your previous question I show you, how to draw arrows, What is your problem now? – Zarko Aug 21 '23 at 19:50

2 Answers2

2

Here's a way to start with your code and modify it a little for more clarity, introducing most of what you miss. Some remarks:

tikzlibraries + tikzset

Most are not needed for this diagram. I didn't check the \tikzset statement, which may duplicate what comes later.

Own styles

I moved your redundant formats for \node and \draw to the beginning, called blk and ln respectively. This makes code more redable, most of the time (refactoring).

Specifying border anchors

If N is your nodes name, then the polar "coordinate" N.20 lies on the nodes shape (which happens to be a rectangle) at +20 deg measured from the nodes center.

This way you can "move" the arrows along the shape.

Because you use digits as node names, 2.130 and 5.-20 look peculiar, but still are border anchors. I.e. it's not 2.130mm for example. See the recent discussion and links to the pgfmanual.

I colored those lines in red, to better see them.

Missing connectors (in orange)

Pretty straight forward, defining intermediate nodes for the meanders, combining your approach and the border anchors in polar notation.

"Image" inside node 5

I suggest to draw that interior as a \pic, and replace said node by that \pic, see here in the pfgmanual. Then you have a clearer separation between the internals of said block and its outer connections. Drawing your sketch is not useful in my view (as an electronics engineer in this case).

result

\documentclass[border=0.2cm]{standalone}

% More defined colors %\usepackage[dvipsnames]{xcolor}% <<< not needed here

% Required package \usepackage{tikz}

%\usetikzlibrary{arrows,shapes,backgrounds,patterns,fadings,matrix,arrows,calc, % intersections,decorations.markings, % positioning,external,arrows.meta}% <<< not needed here

\usetikzlibrary{arrows,positioning,arrows.meta} % ... leave uncehcked as is ............... \tikzset{ block/.style = {draw, rectangle, minimum height=1cm, minimum width=2cm}, input/.style = {coordinate,node distance=1cm}, output/.style = {coordinate,node distance=6cm}, arrow/.style={draw, -latex,node distance=2cm}, pinstyle/.style = {pin edge={latex-, black,node distance=2cm}}, sum/.style = {draw, circle, node distance=1cm}, }% ???

\begin{document}

\begin{tikzpicture}[% moving blk and ln here
    auto, 
    node distance=0.5cm,
    &gt;=latex', 
    scale=0.8, 
    transform shape,
    blk/.style={draw=black,
                minimum width=2cm,
                minimum height=1.2cm},
    ln/.style={line width=0.25mm},
    ]
% ~~~ blocks ~~~~~~~~~~~~~~~~~~~~~~~~
\node [input, name=input] {};
\node [sum, right=1.5cm of input, line width=0.25mm,] (sum) {};

\node [blk,right=1.5cm of sum]      (1) {1};
\node [blk,right=1.5cm of 1]        (2) {2};          
\node [blk,right=1.5cm of 2]        (3) {3?};    

\node [blk, above right =1cm 
            and -0.5cm of 1]        (4){4};   

\node [blk, right =1.3cm of 4]      (6){6};   
\node [blk,above = 1cm of 3]        (5){(5)};   % &lt;&lt;&lt;

% ~~~ sum at input ~~~~~~~~~~~~~~~~~~~
\node [minimum width=1mm,
line width=0.25mm,
minimum height=1.4cm, output, right=1 cm of 3] (y) {};

%~~~ connectors ~~~~~~~~~~~~~~~~~~~
\draw [-&gt;,ln]   (input) -- node {r} (sum);
\draw [-&gt;,ln]   (sum) -- (1);
\draw [-&gt;,ln]   (1) -- (2);
\draw [-&gt;,ln]   (2) -- (3);
\draw [ln]      (3) --  (y);
\draw [-&gt;,ln]   (6.west) --(4.east);
\draw [-&gt;,ln]   (y) -- ++ (0,-1.5) -| node [pos=0.98, right] {$-$} (sum.south);

\draw[-&gt;,ln] (4.south) -- ++ (0,-0.5) -|   (1.north); 

\draw[-&gt;,ln,red] (4.south)+(0,-0.5) -|  (2.130); % &lt;&lt;&lt;
\draw [-&gt;,ln,red] (y)  |- node [pos=0.98, left] {} (5.20);% &lt;&lt;&lt;

% ~~~ new lines ~~~
\draw[-&gt;,ln,orange] (2.east) -- ++(.5,0) |- ++(0,.9) -- ++(3.5,0) |- (5.-20);
\draw[-&gt;,ln,orange] (2.50) |-++(3,.6) -- (5.south);

\end{tikzpicture}

\end{document}

MS-SPO
  • 11,519
1
  • As starting point I use a wee bit modified code from addendum to my answer.
  • Since structure of the switch in block sensor3 is unclear to me, the switch is drawn so, as according to my opinion has a logical structure.
  • All changes in code (in comparison to starting MWE) are market.
\documentclass[border=3mm]{standalone}
\usepackage{tikz}
\usetikzlibrary{arrows.meta,
                calc, chains,
                ext.paths.ortho,    % defined in the tikz-ext package,
                                    % https://ctan.org/pkg/tikz-ext?lang=en
                positioning,
                quotes}
\tikzset{
    node distance = 8mm and 6mm,
      start chain = A going right,
       arr/.style = {-Straight Barb},
       Car/.style = {-{Circle[open]}},   % new
     block/.style = {draw, thick, minimum height=11mm, minimum width=22mm},
       dot/.style = {suspend join,
                     circle, draw, fill, inner sep=1.2pt, node contents={}},         
       sum/.style = {circle, draw, thick, inner sep=2pt, node contents={\huge +}}   
        }
\makeatletter
\tikzset{suspend join/.code={\def\tikz@after@path{}}}  
\makeatother
\begin{document}
    \begin{tikzpicture}
% main branch
    \begin{scope}[nodes = {on chain=A, join=by arr}]
\coordinate (in);
\node[sum];                             % A-2
\node[block]    {$A(s)$};
\node[block]    {$B(s)$};
\node[block]    {$C(s)$};
\node[dot, join=by -];    
\node[block]    {$D(s)$};
\node[dot, join=by -];                  % A-7,
\coordinate (out);
    \end{scope}
    \path[draw=none]   (A-8) to["$x$"] (out);
% top branch
\node [block, above=of A-4]  (sensor1) {$E(s)$};
\node [block, above=of A-5]  (sensor2) {$F(s)$};
\node [block, above=of A-7]  (sensor3) {};

% switch (NEW) \coordinate (s-out) at ([xshift=-2mm] sensor3.center); % <--- \coordinate[right=2mm] (s-in1) at ([yshift=+2mm] sensor3.center); % <--- \coordinate[right=2mm] (s-in2) at ([yshift=-2mm] sensor3.center); % <--- \coordinate (s-in1a) at (s-in1 -| sensor3.east); % <--- \coordinate (s-in2a) at (s-in2 -| sensor3.east);; % <--- % \draw[Car] (sensor3.west) -- (s-out); % <--- \draw[Car] (s-in1a) -- (s-in1); % <--- \draw[Car] (s-in2a) -- (s-in2); % <--- % \draw[thick] (s-out) -- (s-in1); % <--- \draw[dashed] (s-in1 -| sensor3.south) -- (sensor3.south); % <---

% arrows not considered in the join macro \draw[arr] (sensor3) edge (sensor2) (sensor2) edge (sensor1);

\draw[arr] ([xshift=-3mm] sensor1.south) |-| (A-3); \draw[arr] ([xshift=+3mm] sensor1.south) |-| ([xshift=-3mm] A-5.north); \draw[arr] ([xshift=+3mm] A-5.north) |-| (sensor3);
\draw[arr] (A-6) |- ([yshift=-6mm] sensor3.south) r-rl (s-in2a); % changes \draw[arr] (A-8) |- (s-in1a); % changes

\draw[->] (A-8) r-du (A-2); \end{tikzpicture} \end{document}

enter image description here

  • Is this what you after?
  • If not, please clarify your question!
Zarko
  • 296,517