This is a working but basic answer; it's somewhat involved. Also, I am not a programmer by any definition, nor an Os X expert. Surely there are better ways to achieve the same effect.
At the end of the answer, there's a link where you can download a copy of the app described in the post.
Background
In Os X, any directory with an extension can be a "document bundle". To determine if a directory is a bundle, some application has to declare the extension as a bundle.
The simplest way to code an application is to use the (free) software Platypus. This software will wrap your shell script into a mac app (and it does much more).
In principle, you can use directly a script and hand wrap it as an app, but this is not supported in 10.6. I own a machine with 10.6, so I decided to use Platypus to give it support for .texd documents.
Artwork
The same app that claims ownership of the bundle can set up a bundle icon. I made up one using docerator and artwork from here, which looks like this:

The document icon ended up looking like this:

Shell script
Now, on to the programming part. Basically, what you want here is script that tells TeXShop (or some other software of your choice) to open the .tex file inside the .texd directory. I cooked a quick and dirty script, let's call it bundle-actions.sh.
The input to the script is the full path to the bundle, i.e., something like "/Users/koji/Documents/TeX/My test Bundle.texd". The script looks inside the .texd folder for
- A file called main.tex – This is the best option.
- A file called with the same name of the enclosing .texd folder, i.e. ".../LetterToSanta.texd/LetterToSanta.tex". Mainly for backwards compatibility, though I don't like it too much. Changing the name of the enclosing bundle document can break the bundle. Not so clever.
- Any single .tex file, if there's one.
If none of the above works, you have to go inside the .texd bundle (right click, "Show Package Contents") and fix it up yourself.
Also, there's a basic QuickLook support. In QuickLook, tapping the space bar from the Finder will give you some preview of the bundle. I chose to direct QuickLook to the .pdf file corresponding to the .tex file described above. The support is "basic" in the sense that there's no error checking. If there's no QuickLook folder inside the bundle, it will create one and link Preview.pdf (name's fixed by QuickLook) to the main pdf file. Also, it will flag it as hidden, so it doesn't pop up in your finder view.
Finally, the Finder will also reveal the contents of the bundle. This is so you can add files, delete, make subdirectories etc. Caution: It sometimes works, and sometimes the Finder will not let you make changes. In that case, go back one step, right click the bundle and "Show Package Contents". Then you'll be able to edit inside the bundle.
The Shell script is this:
#!/bin/sh

# This is the ".texd" bundle opener for MacOS.
# It looks inside the .texd directory to open
# some tex file.

# The algorithm is: if there's a main.tex file, open that.
# If not, but there's a .tex file with the same name of the .texd
# bundle, open that (e.g. letterToSanta.texd/letterToSanta.tex)
# If not, but there's only one tex file, open that.

#osascript -e 'quit app "TeXShop"'

TSFile="$1"
sameFile="$1/`basename $1 .texd`.tex"
# This here is to compute the number of .tex files in .texd folder
noTeXs="`ls \"$1\"/*.tex 2>/dev/null | wc -l|cut -d' ' -f 8`"


if [ -f "$1/main.tex" ] ; then
    TSFile="$1/main.tex"
elif [ -f "$sameFile" ] ; then
    TSFile="$sameFile"
elif [ $noTeXs -eq 1 ] ; then
    TSFile="`ls \"$1\"/*tex`"
else
    osascript -e 'tell app "TeX Bundle" to display dialog "I could not find a TeX file to open"'
    exit
fi;

# OPTIONAL:
# Add a TeX subtree inside the bundle.
export TEXMFHOME="$1/texmf:`/usr/texbin/kpsewhich -var-value TEXMFHOME`"

# ==========================
# = Basic QuickLookSupport =
# ==========================
# If QuickLook subdirectory does not exist, create it
# a link to the .pdf file, and hide it,
# so that the .texd document previews as .pdf
if ! [ -d "$1/QuickLook" ]  ; then
    # File aliases would be useful here, but you can't
    # make file aliases inside a bundle :(
    # In any event, removing the QuickLook subdir, will recreate it next time

    mkdir "$1/QuickLook" && ( cd "$1/QuickLook";  ln -s  "../`basename \"$TSFile\" .tex`.pdf" \
            "Preview.pdf"  ) && /usr/bin/chflags hidden "$1/QuickLook"
fi


# =====================
# = Call the programs =
# =====================

# Reveal what's inside the .texd
open -R "$TSFile"
# Open TeXShop
open -a TeXShop "$TSFile"
Making the app
Now, fire up Platypus and setup a project like this:
- Set your artwork.
- Output: None
- Identifier: org.koji.TeXBundle (or some such)
- Author: Yourself here.
- Set flag "Run in background"
- Unset all other flags.
- Set "Accepts dropped items". Once you set this, a button "Settings" will appear. Click it and,
- Delete extension *
- Add extension texd
- app is "Viewer"
- Choose your artwork and set it up with "Select document icon"
Here are a couple of screen grabs of the options:


Now create an application and save it. Optimize it if you want, but make sure to mark the option "Use XML property list format instead of binary". This is important!

Final touches
Now comes the last touch; you'll need to go behind OSX's back to trick it into treating directories as file bundles.
Open the terminal, and cd /path/to/your/application/TeXBundle.app/Contents, and edit the file Info.plist. You'll need a plain text editor to edit it. Use vi Info.plist or open -a TextEdit Info.plistor what-have-you.
Go to the part that reads:
    <dict>
        <key>CFBundleTypeExtensions</key>
        <array>
            <string>texd</string>
        </array>
        <key>CFBundleTypeIconFile</key>
        <string>docIcon.icns</string>
        <key>CFBundleTypeRole</key>
        <string>Viewer</string>
    </dict>
And change it to
            <dict>
                    <key>CFBundleTypeExtensions</key>
                    <array>
                            <string>texd</string>
                    </array>
                    <key>CFBundleTypeIconFile</key>
                    <string>docIcon.icns</string>
                    <key>CFBundleTypeRole</key>
                    <string>Viewer</string>
                    <key>LSTypeIsPackage</key>
                    <string>YES</string>
            </dict>
The LSTypeIsPackage part that you add is where the magic happens. From now on, Os X will let you see .texd folders as files.
To test it, make a folder "test", and inside it, edit "main.tex" to look like this:

and
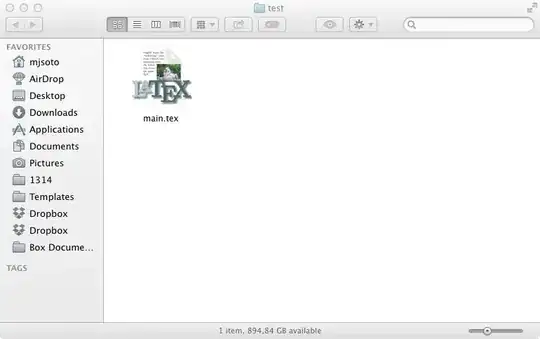
The file main.tex can be anything; try this:
\documentclass{article}
\begin{document}
    I work!
\end{document}
Now go back one level, and add the extension .texd to the folder test. Finder should look like this:

Notice how the folder now takes the appearance of a file, with your selected artwork. Double clicking in it will launch TeXShop and open a Finder window to inside the texd folder.
After one compilation, tapping the space bar while in the finder will show a preview of the pdf you obtained from latex.
Disclaimers
I am not a programmer. I don't know what I am doing; I only researched a bit the answer because the question was interesting. You are on your own if you loose information. Ask someone with real knowledge before trying this.
Hopefully someone will improve on this answer.
Download
I uploaded a copy of the bundle app to File Dropper. Use with caution.
Do you think if you bundle the files, you still will be able to have this feature to quick preview the pdf?
– Pouya Dec 20 '13 at 10:53