13

Partial or entire Image Blurring in TikZ?

I have seen some examples of drop shadow blurring in the pgf-blur package version 1.01 by Martin Giese but this isn’t what I mean. Is it somehow possible to do partial or entire Image Blurring in TikZ, just like what one may do in Adobe Photoshop?

Hector
  • 141
  • 3
    Close voters: Please grant some time for improving the question –  Feb 21 '16 at 13:48
  • 2
    Welcome to TeX.SX! Are you wanting to blur an existing image (raster or vector) that is included in the tikzpicture, or are you wanting to blur parts drawn in TikZ? – Paul Gessler Feb 21 '16 at 14:26
  • If you are talking about image inclusion, even if something could be done, you will get far better results more easily by using a graphics programme. It is not, of course, in any way necessary to use one of Adobe's rather expensive products for this. Excellent free programmes are available which are more than adequate for this kind of task. (GIMP is one, although, like Photoshop, definitely overkill for a simple task.) – cfr Feb 21 '16 at 19:37
  • 1
    I would be very interested in this as well! I often use TikZ in connection with beamer, where I draw an intermediate overlay over a slide. To make this overlay more readable, I would like to blur out the slide and draw the overlay on top of the existing slide. – Dan Apr 01 '16 at 12:14
  • What I want to do is to blur from within TikZ an existing image raster or vector entirely or partly. I do have Photoshop and GIMP but I just want to keep all actions within TikZ. – Hector Apr 02 '16 at 20:36
  • Dan, you could have the same effect that you wish to do in Beamer using opacity (0.3 - 0.5) rather than blurring. I want blurring from within TikZ as a matter of principle and for entirely artistic reasons. – Hector Apr 02 '16 at 20:39

3 Answers3

14

Manuel had the proposal :

Maybe one could copy the original picture lets say 8 times, add a transparency of 50% and then shift the different copies randomly and then overlay everything.

I took his idea and made an example.

The logic in my example:

  • Take the image and insert it five times. Four copies are shifted in different directions.
  • Insert it again, but clip it to an interesting area.

The Code:

\documentclass[tikz]{standalone}
%\usepackage{luatex85} %if used with lualatex
\usepackage{graphicx}
%Parameters:
%- at position
%- blur parameter
%- image name
\newcommand\blurredimage[3]{
  \node[opacity=0.2] at (#1) {\includegraphics{#3}};
  \node[opacity=0.2] at (#1+ #2, #2) {\includegraphics{#3}};
  \node[opacity=0.2] at (#1+-#2, #2) {\includegraphics{#3}};
  \node[opacity=0.2] at (#1+-#2,-#2) {\includegraphics{#3}};
  \node[opacity=0.2] at (#1+ #2,-#2) {\includegraphics{#3}};
}
% ----------------------------------------------------------------
\begin{document}
\begin{tikzpicture}
\blurredimage{0.0,0.0}{.2}{mypic}
\begin{scope}
  \clip (-3.5,-8) rectangle (-1,-5);
  \node[] at (0,0) {\includegraphics{mypic}};
\end{scope}
\end{tikzpicture}

\end{document}

Taking an image from Wikipedia you get the following result:

Mona Lisas hand

To make it more flexible you could use key value parameters for blur factor, opacity (and position?).

Maybe you could get better results with a pattern over the background images.

To blur only areas you can do it in the opposite way: Insert the image, then add multiple times a clipped area of the image.

knut
  • 8,838
4

Image blurring is essentially a pixel-based operation and hence vector based diagrams need to be treated as rasterized images. TikZ or TeX cannot handle this on their own.

The image needs to be exported, blurred and then brought back and used as external image or some quite nontrivial hacks to save it to a box as a snapshot and somehow loose the vector graphics properties so on. I can't think of anyway to do that automatically now but some external function calls can be added just to blur the images after externalization.

percusse
  • 157,807
  • 3
    Maybe one could copy the original picture lets say 8 times, add a transparency of 50% and then shift the different copies randomly and then overlay everything. I go to bed now otherwise I could have tested it manually. – Dr. Manuel Kuehner Apr 23 '17 at 22:36
3

Here's a sagetex solution, not using tikz for blurring the Wikipedia picture. Just find some Python code online, such as from here to find many ways of manipulating your image. I've picked BLUR and CONTOUR.

\documentclass{article}
\usepackage{sagetex}
\usepackage{graphicx}
\begin{document}
Here is the images:\\
\includegraphics[width=2in]{Mona.png}

\begin{sagesilent} from PIL import Image from PIL import ImageFilter from PIL.ImageFilter import (BLUR,CONTOUR) img = Image.open('Mona.png') img.filter(BLUR).save('MonaBlur.png') img.filter(CONTOUR).save('MonaContour.png')

result1 = r"\includegraphics[width=2in]{MonaBlur.png}" result2 = r"\includegraphics[width=2in]{MonaContour.png}"

\end{sagesilent} \sagestr{result1} \sagestr{result2} \end{document}

The result is shown below, running in CoCalc: enter image description here

EDIT: Now to handle the partial blurring. From this page I get some instruction on cropping and pasting the cropped image onto another image. I cropped the hands from the original image and pasted them onto the blurred image of the blurred image.

\documentclass{article}
\usepackage{sagetex}
\usepackage{graphicx}
\begin{document}
Here is the images:\\
\includegraphics[width=2in]{Mona.png}

\begin{sagesilent} from PIL import Image from PIL import ImageFilter from PIL.ImageFilter import (BLUR,CONTOUR) img = Image.open('Mona.png') Copyimg = img.copy() croppedIm = img.crop((75, 340, 200, 450)) croppedIm.save('cropped.png') Copyimg.paste(croppedIm, (0, 0))

img.filter(BLUR).save('MonaBlur.png') img.filter(CONTOUR).save('MonaContour.png') img2 = Image.open('MonaBlur.png') img2.filter(BLUR).save('MonaBlurBlur.png') img2.paste(croppedIm, (75, 340, 200, 450)) img2.paste(croppedIm, (400, 500)) img2.save('box.png')

result1 = r"\includegraphics[width=2in]{MonaBlur.png}" result2 = r"\includegraphics[width=2in]{MonaContour.png}" result3 = r"\includegraphics[width=2in]{box.png}" result4 = r"\includegraphics[width=2in]{cropped.png}" \end{sagesilent} \sagestr{result1} %\sagestr{result2} \sagestr{result3} \sagestr{result4} \end{document}

The output in CoCalc is now: enter image description here

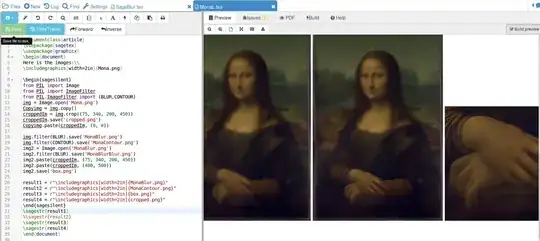
The last image is the crop of the hands. This has been pasted onto the spot where it was taken from but now it's on the blurred image. If you click on the image (for a closer view) you will see that the second of the 3 pictures has a fuzzy Mona, except for her hands.

By using Python you get access to a lot of built in commands to manipulate your images.

DJP
  • 12,451