5

I try to draw the following picture:

enter image description here

My corresponding code is

\documentclass{article}
\usepackage{tikz-cd}
\begin{document}
\begin{tikzcd}[={nodes={draw}}]
1\arrow{drr}&&                                    &&            &&                    &&& &                       & \\
            &&2\arrow{drr}\arrow[dashed]{rrrrrrrr}&&            &&                    &&& &5\arrow{ddl}\arrow{ddr}& \\
            &&                                    &&3\arrow{drr}&&                    &&& &                       & \\
            &&                                    &&            &&4\arrow[dashed]{rrr}&&&6&                       &7
\end{tikzcd}
\end{document} 

My method is very "violent". Insert the document looked too big to form a sharp contrast with the original image, the number in the picture is too small, like this:

enter image description here

Expect you to provide remedial measures :)

poorich
  • 613

2 Answers2

7

Update:

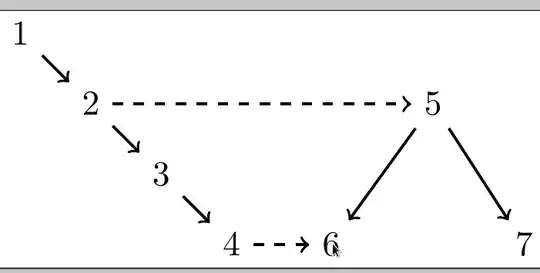
the correct way, using the non-deprecated below = of instead of the old below of =, will be the following (see Why positioning "above" is at a different height than "above right"?):

\documentclass{standalone}
\usepackage{tikz}
\usetikzlibrary{arrows,positioning,calc}
\begin{document}
\begin{tikzpicture}[
    thick,  on grid]
    \node (n1) {1};
    \node [below right = of n1] (n2) {2};
    \node [below right = of n2] (n3) {3};
    \node [below right = of n3] (n4) {4};
    \node [right = of n4] (n6) {6};
    \node [above right = of n6] (phantom) {};
    \node [above = of phantom] (n5) {5};
    \node [below right = of phantom] (n7) {7};
    \begin{scope}[->]
        \draw (n1) -- (n2);
        \draw (n2) -- (n3);
        \draw (n3) -- (n4);
        \draw (n5) -- (n6);
        \draw (n5) -- (n7);
        \draw[dashed] (n2) -- (n5);
        \draw[dashed] (n4) -- (n6);
    \end{scope}
\end{tikzpicture}
\end{document}

which leads to:

Image from the code above

Old answer (left as reference... for now):

This works, althoug I do not know why you need the yshift on node 5...

\documentclass{standalone}
\usepackage{tikz}
\usetikzlibrary{arrows,positioning,calc}
\begin{document}
\begin{tikzpicture}[
    thick, node distance=1cm]
    \node (n1) {1};
    \node [below right of=n1] (n2) {2};
    \node [below right of=n2] (n3) {3};
    \node [below right of=n3] (n4) {4};
    \node [right of=n4] (n6) {6};
    \node [above right of=n6] (fake) {};
   \node [above of=fake, yshift=-0.3cm] (n5) {5}; %% WHY?
    \node [below right of=fake] (n7) {7};
    \begin{scope}[->]
        \draw (n1) -- (n2);
        \draw (n2) -- (n3);
        \draw (n3) -- (n4);
        \draw (n5) -- (n6);
        \draw (n5) -- (n7);
        \draw[dashed] (n4) -- (n6);
        \draw[dashed] (n2) -- (n5);
    \end{scope}
\end{tikzpicture}
\end{document}

Result of above code

Or, without the strange yshift:

\documentclass{standalone}
\usepackage{tikz}
\usetikzlibrary{arrows,positioning,calc}
\begin{document}
\begin{tikzpicture}[
    thick, node distance=1cm]
    \node (n1) {1};
    \node [below right of=n1] (n2) {2};
    \node [below right of=n2] (n3) {3};
    \node [below right of=n3] (n4) {4};
    \node [right of=n4] (n6) {6};
    \node [right = 3cm of n2] (n5) {5};
    \node [right = 1.5cm of n6] (n7) {7};
    \begin{scope}[->]
        \draw (n1) -- (n2);
        \draw (n2) -- (n3);
        \draw (n3) -- (n4);
        \draw (n5) -- (n6);
        \draw (n5) -- (n7);
        \draw[dashed] (n4) -- (n6);
        \draw[dashed] (n2) -- (n5);
    \end{scope}
\end{tikzpicture}
\end{document}

second try

...and now the line between 2 and 5 is perfectly horizontal.

Rmano
  • 40,848
  • 3
  • 64
  • 125
  • It's a very good method, when I use \node (n1) {\ref{XXX}}; I can jump to the label place at XXX, but have a problem, how change the appearance of the display we see the \ref{XXX}? Maybe I can't say it more clearly. – poorich Apr 06 '16 at 11:30
  • @poorich me don't understand.... but it seems worth a different question, I think. – Rmano Apr 06 '16 at 11:34
6

Removing the empty cells and instead using the keys row sep and column sep, you can achieve any aspect ratio/scaling you'd like.

Adjust the lengths 0.25cm and 0.5cm to taste.

\documentclass{standalone}
\usepackage{tikz-cd}

\begin{document}
\begin{tikzcd}[row sep=0.25cm,column sep=0.5cm]
1\arrow{dr}&                               &           &                  & &                       & \\
           &2\arrow{dr}\arrow[dashed]{rrrr}&           &                  & &5\arrow{ddl}\arrow{ddr}& \\
           &                               &3\arrow{dr}&                  & &                       & \\
           &                               &           &4\arrow[dashed]{r}&6&                       &7
\end{tikzcd}
\end{document}

enter image description here

Paul Gessler
  • 29,607
  • There is a lack of understanding of the settings in the [...], which limits the improvement of my drawing level. Thanks! – poorich Apr 02 '16 at 14:07