9

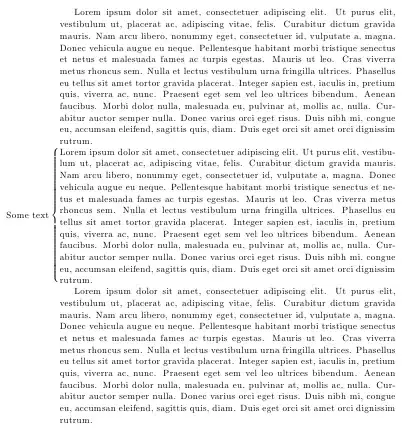
Within a text, I would like to emphasize one or two paragraphs by placing a curly brace in the left side margin, and next to it some short text vertically centred around the brace's centre.

The question Adding a large brace next to a body of text shows how to add braces in the main text, maybe that can help as a starting point? A slight modification of the accepted answer there is

\documentclass{report} 
\usepackage{lipsum}

\begin{document}
\lipsum[1]
\noindent$\left\{
\begin{minipage}{\textwidth}
\lipsum[2]
\end{minipage}
\right.$
\lipsum[3]
\end{document}

But this has the drawbacks that

  1. it spills into the right, not the left margin;
  2. I cannot add text to the brace; and that
  3. the line spacing before the braced paragraph is incorrect.

Maybe this can be modified, or a completely different approach should be used? But I wouldn't know which one.

D.Roepo
  • 3,347

5 Answers5

7

You can use a \makebox to define a new command with two arguments: the first one will contain the text for the brace, and the second one will contain the paragraph text; something along these lines:

\documentclass{report} 
\usepackage{amsmath}
\usepackage{lipsum}

\newcommand\BrText[2]{%
  \par\smallskip
   \noindent\makebox[\textwidth][r]{$\text{#1}\left\{
    \begin{minipage}{\textwidth}
    #2
    \end{minipage}
  \right.\nulldelimiterspace=0pt$}\par\smallskip
}    

\begin{document}
\lipsum[1]
\BrText{Some text}{\lipsum[1]}
\lipsum[1]
\end{document}

enter image description here

Gonzalo Medina
  • 505,128
  • 1
    Instead of guessing the dimension for the \makebox you can say \noindent\makebox[\textwidth][r]{...}; also you should set \nulldelimiterspace=0pt just before the closing $, otherwise a .5pt shift would apppear on the right. – egreg Nov 07 '11 at 17:35
2

\psbrace from pstricks-add package can do this. You need to position two nodes, and them connect them with the brace:

\documentclass{article}
\usepackage{pstricks,pstricks-add,lipsum}
\begin{document}
\lipsum[1]
\makebox[0pt]{\makebox[1.5cm][l]{\pnode{A}}}
\lipsum[2]
\makebox[0pt]{\makebox[1.5cm][l]{\pnode{B}}}
\lipsum[3]
\psbrace[rot=180,ref=r, nodesepA=-2ex](A)(B){Text}
\end{document}

enter image description here

Boris
  • 38,129
  • is it intentional that the brace isn't coextensive with the text? i wouldn't have guessed it from the code. – barbara beeton Nov 07 '11 at 19:36
  • You mean the end is below the paragraph? I should put the second node slightly higher... – Boris Nov 07 '11 at 19:39
  • and perhaps the first node might be a bit higher as well -- at the top of the first line of that paragraph. raising the height of both beginning and end by the same amount should do it. – barbara beeton Nov 07 '11 at 19:48
  • Surely. These adjustments can be made to taste... – Boris Nov 07 '11 at 19:58
  • For simplicity, let P be the paragraph covered by the brace. Am I right when I say that this is the only answer where P is not put inside a box or minipage? If yes, does this mean that this is the only solution where P can be broken in multiple pages? – GeekInDisguise May 21 '21 at 17:57
  • Yes, I think so – Boris May 21 '21 at 18:09
  • Many thanks! And another thing, did you notice that the brace is slightly shifted down w.r.t. the paragraph? Do you know how remove this "offset"? Also, why did you put \psbrace after \lipsum[3] (i.e. the subsequent paragraph) instead of putting it immediatly after the second \makebox command? – GeekInDisguise May 21 '21 at 18:24
  • Solved the vertical offset issue! In my case, I just replaced the two \pnode commands with \pnode(0,0.5){A} and \pnode(0,0.5){B} respectively, where the 0 value should always be 0 and the 0.5 value worked for my particular case and could be different in other cases. – GeekInDisguise May 21 '21 at 18:39
2

Here is another approach that utilized the environ package. The two-step procedure boxes the contents (in \savetextbox) in order to get its height. Then it typesets the left brace in the margin, and then the box.

In the following minimal working example, a new environment bracetext is defined. It takes an optional argument which specifies the width of the text block (default is \textwidth). It is possible to modify this environment to take arguments (optional or mandatory) for the text to be displayed on the left-hand side as well.

enter image description here

\documentclass{report}
\usepackage{environ}% http://ctan.org/pkg/environ
\usepackage{lipsum}% http://ctan.org/pkg/lipsum
\newbox{\savetextbox}
\NewEnviron{bracetext}[1][\textwidth]{%
  \begin{lrbox}{\savetextbox}%
    \begin{minipage}{#1} \BODY \end{minipage}
  \end{lrbox}%
  \smallskip%
  \noindent\makebox[0pt][r]{$\left\{\rule{0pt}{\ht\savetextbox}\right.$}%
  \usebox{\savetextbox}\par
  \smallskip%
}
\begin{document}
  \lipsum[1]
  \begin{bracetext}
    \lipsum[2]
  \end{bracetext}
  \lipsum[3]
\end{document}​

The lipsum package was used to provide dummy text Lorem Ipsum... style.

Note this one caveat of this approach is that the brace will not split across pages. If you want something that splits across pages, you should consider using mdframed. However, it does not support bracing as you requested.

Werner
  • 603,163
  • sadly, the baselines above and below the braced text aren't the same as elsewhere in the text, and the braced text doesn't have a paragraph indent (maybe that's intentional). – barbara beeton Nov 07 '11 at 19:28
  • The latter was intentional as a consequence of inserting content in a minipage environment. Do you have a suggestion how to fix the former? – Werner Nov 07 '11 at 19:31
  • fixing the baseline above the minipage can be done by ending the previous line with a \strut. actually, since you've used \smallskip here, four \struts should do the job instead -- one on the previous line, one at the beginning of the minipage after a \leavevmode, one at the end of the minipage, and the last one after a \leavevmode (or \indent) at the beginning of the line beginning the next paragraph. \struts are your friend; they serve to maintain even baselines much more reliably than \*skips. – barbara beeton Nov 07 '11 at 19:45
1

Another solution: The schemata package.

\documentclass{article}
\usepackage{schemata}
\usepackage{lipsum}
\begin{document}

\lipsum[1]

\hspace{-1cm}\schema{}{\lipsum[2]}

\lipsum[3]

\end{document}

MWE

Fran
  • 80,769
1

This is a modification of the answer provided by Gonzalo Medina, so that it works for two-column pages:

\documentclass[twocolumn]{article}
\usepackage{amsmath}
\usepackage{lipsum}

\makeatletter
\newcommand\BrLeftText[2]{%
  \par\smallskip
   \noindent\makebox[\columnwidth][r]{$\text{#1}\left\{
    \begin{minipage}{\columnwidth}
    #2
    \end{minipage}
  \right.\nulldelimiterspace=0pt$}\par\smallskip
}    
\newcommand\BrRightText[2]{%
  \par\smallskip
   \noindent\makebox[\columnwidth][l]{$\left.
    \begin{minipage}{\columnwidth}
    #2
    \end{minipage}
  \right\}$\text{#1}\nulldelimiterspace=0pt}\par\smallskip
} 
\newcommand\BrText[2]{
\if@firstcolumn \BrLeftText{#1}{#2} \else \BrRightText{#1}{#2} \fi
}
\makeatother

\begin{document}

\BrText{left}{\lipsum[1]}
\newpage
\BrText{right}{\lipsum[1]}

\end{document}

enter image description here

MajidL
  • 301