Transparency effects are a relatively new feature for PDF (≥ 1.4) and many printers do not yet support it "out of the box" (basically, this requires a PostScript Level 3 RIP with additional PDF 1.4 extensions). So the printing system (printer driver) has to "flatten" transparency effects by rasterizing objects into ordinary CMYK objects before sending them to the printer.
Rasterizing is usually done page-wise: The complete page is rasterized into a bitmap and then send to the printer. This also effects the other content of the page, resulting in the observed "coarse appearance" of the text.
(Note: The effect may as well be the same with printers that claim to support PostScript Level 3 with PDF 1.4, but performs a similar transformation just inside the printer. One really has to check with the actual printer.)
Workaround
The way out would be to flatten transparency effects in PDF graphics before embedding them into the document, so that the printer driver has no reason to rasterize a whole page. Adobe provides a white paper with some background info and how to achieve this with their products. My approach would be to use ghostscript to convert the respective images to PDF 1.3:
ps2pdf13 image.pdf image-13.pdf
Unfortunately, ghostscript also just rasterizes the page, so the fonts inside the image will still get the "coarse appearance" and their text is no longer selectable in the resulting image. (This is also the reason that transforming the complete document to PDF 1.3 before printing is not an option. Maybe the Adobe tools do a better job here.)
You need separate PDFs of your graphics, so TikZ images have to be compiled into PDFs and included with \includegraphics. Martin Scharrer's standalone class may be helpful for this.
Seamless Integration for TikZ
The conversation to PDF1.3 could also be performed seamlessly by (mis-)using the TikZ Externalization Library (PGF Manual 2.1, pp. 343ff). In short, "this library provides a high-level automatic or semi–automatic export feature for TikZ pictures. Its purpose is to convert each picture to a separate pdf without changing the document as such."
The good thing is that this conversion process can easily be customized (thanks to Andrew Stacey for this hint!) to a sequence of arbitrary commands with the external/system call key. Whatever PDF eventually comes out of this process will be used.
To figure out the best sequence of commands for a particular printer, one could also use the default external/system call setting and manipulate the generated PDF for the figure (which usually has a name like \jobname-figureXXX.pdf) manually. It will then be used (and not overwritten) in the next compilation with pdflatex.
The following MWE also demonstrates how implicit rasterizing can be enabled and disabled with \tikzexternalizeenable and \tikzexternalizedisable. It has to be compiled with the -shell-escape option given to pdflatex:
\documentclass[a4paper, 11pt]{article}
\usepackage[T1]{fontenc}
\usepackage[fulloldstylenums]{kpfonts}
\usepackage{microtype}
\usepackage{lipsum}
\usepackage{tikz}
% setup externalization
\usetikzlibrary{external}
\tikzexternalize
\tikzexternaldisable
\tikzset{external/system call={%
pdflatex \tikzexternalcheckshellescape -halt-on-error -interaction=batchmode -jobname "\image" "\texsource";
ps2pdf13 "\image".pdf "\image-13".pdf && cp "\image-13".pdf "\image".pdf}}
\begin{document}
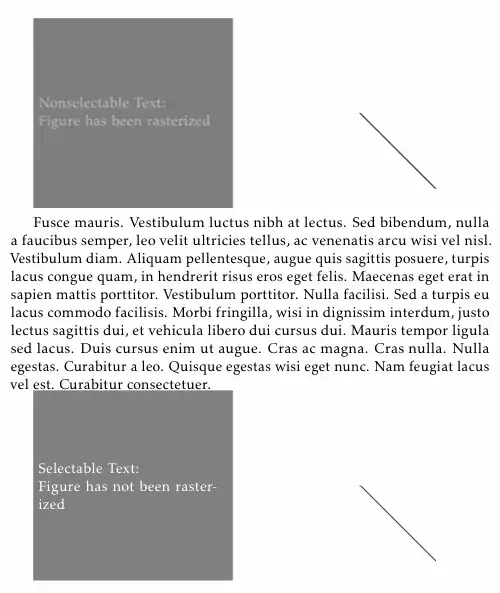
% figure uses opacity, enable rasterizing through externalization
% (in the resulting PDF this is observable by the nonselectable node text)
\tikzexternalenable
\begin{tikzpicture}
\node [%
draw, rectangle, fill=black,
minimum size=5cm, text width=5cm,
opacity=0.5,
text=white,
] {Nonselectable Text:\\Figure has been rasterized};
\draw [semithick] (6cm, 0cm) -- (8cm, -2cm);
\end{tikzpicture}
\tikzexternaldisable % back to default
\lipsum[5]
\begin{tikzpicture}
\node [%
draw=black!50, rectangle, fill=black!50,
minimum size=5cm, text width=5cm,
text=white,
] {Selectable Text:\\Figure has not been rasterized};
\draw [semithick] (6cm, 0cm) -- (8cm, -2cm);
\end{tikzpicture}
\end{document}
I have no printer at hand to test the result. However, printing this page should not lead to a "coarse appearance" of the text (sans the rasterized figure, of course):


\usepackage[cmyk]{xcolor}to your preamble make any difference? – matth Jan 05 '12 at 10:23