88

I know how to make a rectangle and fill it.

But what shoud be done to hatch this rectangle with thin 45 degree inclined line with 2mm gap.

\documentclass{article}
\usepackage{tikz}

\begin{document}

\begin{tikzpicture}
%\draw (0,0) rectangle (2,4);
\fill[blue] (0,0) rectangle (2,4);

\end{tikzpicture}

\end{document}

Thank you Altermundus,

I want to hatch area under the curve. But I am unable to use your code as i did with

[pattern=north west lines, pattern color=blue]

Please give little explanation for your code so that i can use it.

\documentclass{article}
\usepackage{tikz}
\usetikzlibrary{patterns}

\begin{document}
\begin{tikzpicture}
\draw[pattern=north west lines, pattern color=blue] (0,0) rectangle (2,4);
\end{tikzpicture}

\begin{tikzpicture}
\draw [thick,pattern=north west lines, pattern color=red] (1,0)--(1,1) to [bend left] (4,4) -- (4,0) --cycle;
\end{tikzpicture}

\end{document}
sandu
  • 7,950
  • Actually, I don't have a clue what you want. Could you probably add a picture (handdrawn or whatever) of what you want to achieve? – Tom Bombadil May 05 '12 at 09:48

3 Answers3

116

You can use the library patterns. For example:

\documentclass{article}
\usepackage{tikz}
\usetikzlibrary{patterns}

\begin{document} \begin{tikzpicture} \draw[pattern=north west lines, pattern color=blue] (0,0) rectangle (2,4); \end{tikzpicture}

\end{document}

which gives you as result:

enter image description here

You find much more in the documentation (pgfmanual): Chapter 62 Pattern Library.

  • @Claudio. Do you know how to apply this to the fill in large typeface? – Nicholas Hamilton Aug 29 '13 at 12:00
  • @ADP: what do you mean for large typeface? – Claudio Fiandrino Aug 30 '13 at 12:26
  • @Claudio say 100pt font used in a chapter page. – Nicholas Hamilton Aug 30 '13 at 13:58
  • @ADP: ultimately you want to apply a pattern to a text, is it? In that case I don't know (notice, the font size does not influence at all the applicability), but I guess it won't be so much easy. – Claudio Fiandrino Aug 30 '13 at 14:06
  • @Claudio. Yest that is exactly what I was seeking. – Nicholas Hamilton Aug 31 '13 at 03:59
  • 2
    I know this question is two years old, but if i try this code to solve my problem, the lines are interrupted and look like dotted lines. Any idea? Thanks – Arne Timperman Dec 09 '14 at 16:21
  • 1
    @Arne: actually I think this can be a problem of the visualizer. I suggest you to zoom and see if the problem persist. – Claudio Fiandrino Dec 09 '14 at 16:29
  • Thanks, I did zoom in at maximum, still the same problem. But indeed printing and the problem was over. (Little white line, but I think it's a problem of the printer). – Arne Timperman Dec 09 '14 at 16:33
  • 2
    What do I do if I don't want a border to the rectangle? – Damitr May 16 '17 at 15:54
  • 2
    @Damitr: Don't use \draw, then but \fill should work. – Claudio Fiandrino May 17 '17 at 16:14
  • @ClaudioFiandrino how would one would this inside an overpic env. \put (40, 40) {\tikz\draw[pattern=north west lines, pattern color=blue] (0,0) rectangle (2,4);} throws an error :( – 3kstc Oct 06 '20 at 22:12
  • @3kstc: I believe this requires a new question. To me this works like a charm: `\documentclass[11pt,a4paper]{article} \usepackage{overpic,tikz} \usetikzlibrary{patterns} \usepackage{mwe}

    \begin{document} \begin{overpic}[abs,unit=1mm,scale=.75,grid]{example-image} \put(3,27){\color{blue}\huge\LaTeX} \put (40, 40) {\tikz\draw[pattern=north west lines, pattern color=blue] (0,0) rectangle (2,4);} \end{overpic} \end{document}`

    – Claudio Fiandrino Oct 07 '20 at 06:01
27

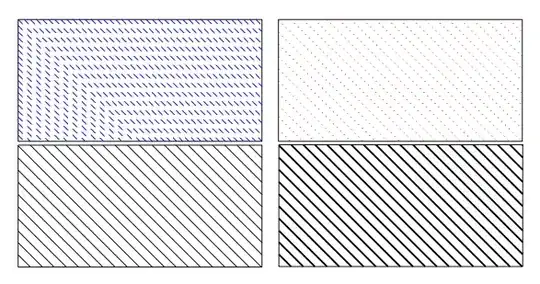
Not exactly an answer but two examples of code to get a crosshatched rectangle without pattern. This code was necessary with the first version of pgf/tikz.

It is possible to get a better code with clip . The second one use fp.

\documentclass[11pt]{scrartcl}
\usepackage{tikz,ifthen,fp,calc}

\makeatletter
\newlength{\tkz@size}
\newlength{\tkz@rect@A}
\newlength{\tkz@rect@B}
\newlength{\tkz@rect@C}
\newlength{\tkz@rect@D}
\newlength{\tkz@hachsep}
\newboolean{tkz@rect@inv}\setboolean{tkz@rect@inv}{false}

\def\tkzhachrect[#1](#2,#3)(#4,#5){%
% A(#2,#3) D(#4,#5)

\draw (#2,#3) rectangle (#4,#5) ;
\setboolean{tkz@rect@inv}{false}
\setlength{\tkz@hachsep}{#1 cm}% sep des hach.
\setlength{\tkz@rect@A}{#2 cm + #3 cm}
\setlength{\tkz@rect@B}{#2 cm + #5 cm}
\setlength{\tkz@rect@C}{#4 cm + #3 cm}

\ifthenelse{\lengthtest{\tkz@rect@B > \tkz@rect@C}}%
{\setlength{\tkz@rect@C}{#2 cm + #5 cm}
\setlength{\tkz@rect@B}{#4 cm + #3 cm}
\setboolean{tkz@rect@inv}{true}%
}{}%
\setlength{\tkz@rect@D}{#4 cm + #5 cm}
\setlength{\tkz@size}{\tkz@rect@A}

\whiledo{\lengthtest{\tkz@size < \tkz@rect@D}}%
{\ifthenelse{\lengthtest{\tkz@size < \tkz@rect@B}}
    {\draw[hstyle] (#2 cm,\tkz@size-#2 cm) -- (\tkz@size-#3 cm,#3 cm);}%else
    {\ifthenelse{\lengthtest{\tkz@size < \tkz@rect@C}}
       {\ifthenelse{\boolean{tkz@rect@inv}}
       {\draw[hstyle] (#2 cm,\tkz@size-#2 cm) -- (#4 cm,\tkz@size-#4 cm);}
       {\draw[hstyle] (\tkz@size - #5 cm,#5 cm) -- (\tkz@size-#3 cm,#3 cm);}%
       }%
    {\draw[hstyle] (\tkz@size - #5 cm,#5 cm) -- (#4 cm,\tkz@size-#4 cm);}}% fi
    \addtolength{\tkz@size}{\tkz@hachsep}
}% end whiledo
}% end def

\def\tkzhachrectfp[#1](#2,#3)(#4,#5){%
\setboolean{tkz@rect@inv}{false}
\FPadd{\deb}{#2}{#3}
\FPtrunc\deb{\deb}{2}
\FPadd{\fin}{#4}{#5}
\FPtrunc\fin{\fin}{2} 
\FPadd{\sone}{#2}{#5}
\FPtrunc\sone{\sone}{2}
\FPadd{\stwo}{#4}{#3}
\FPtrunc\stwo{\stwo}{2} 
\FPifgt{\sone}{\stwo}
\FPset{\temp}{\sone}
\FPset{\sone}{\stwo}
\FPset{\stwo}{\temp}
\setboolean{tkz@rect@inv}{true}%
\else
\fi
\FPadd{\hach}{\deb}{#1}%
\FPtrunc\hach{\hach}{2}%

\draw (#2,#3) rectangle (#4,#5);

\foreach \s in {\deb ,\hach,...,\sone}
   {\FPadd{\oo}{\s}{-#2} 
    \FPtrunc\oo{\oo}{2}%
    \FPadd{\aa}{\s}{-#3} 
    \FPtrunc\aa{\aa}{2}%
    \draw[hstyle] (#2,\oo) -- (\aa,#3);}%
 \FPifeq{\sone}{\stwo}%
\else
   \FPadd{\sone}{\sone}{#1}
   \FPadd{\hach}{\sone}{#1}
   \FPtrunc\hach{\hach}{2}
   %
     \foreach \s in {\sone ,\hach,...,\stwo}
    {\ifthenelse{\boolean{tkz@rect@inv}}
       {\FPadd{\oo}{\s}{-#2} 
       \FPtrunc\oo{\oo}{2}
        \FPadd{\aa}{\s}{-#4} 
        \FPtrunc\aa{\aa}{2}
        \draw[hstyle] (#2,\oo) -- (#4,\aa);}
       {\FPadd{\oo}{\s}{-#5} 
       \FPtrunc\oo{\oo}{2}
        \FPadd{\aa}{\s}{-#3} 
        \FPtrunc\aa{\aa}{2}
        \draw[hstyle] (\oo,#5) -- (\aa,#3);}%
    }% fin de la boucle
\fi%

\FPadd{\stwo}{\stwo}{#1}
\FPadd{\hach}{\stwo}{#1}
\FPtrunc\hach{\hach}{2}

 \foreach \s in {\stwo,\hach,...,\fin}
 {\FPadd{\oo}{\s}{-#5} \FPtrunc\oo{\oo}{2}
  \FPadd{\aa}{\s}{-#4} \FPtrunc\aa{\aa}{2}
    \draw[hstyle] (\oo,#5) -- (#4,\aa);}
 }% end def

\begin{document} 
 \tikzset{hstyle/.style={blue,dashed}}
 \begin{tikzpicture}  
        \tkzhachrect[0.1](2,1)(6,3)
\end{tikzpicture} 
 \tikzset{hstyle/.style={red,dotted}}  
 \begin{tikzpicture}
       \tkzhachrectfp[0.2](2,1)(6,3)
\end{tikzpicture} 

 \tikzset{hstyle/.style={solid,thin}}  
 \begin{tikzpicture}
       \tkzhachrectfp[0.2](2,1)(6,3)
\end{tikzpicture}
 \tikzset{hstyle/.style={solid,thick}}  
 \begin{tikzpicture}
       \tkzhachrectfp[0.2](2,1)(6,3)
\end{tikzpicture}  

\end{document}

enter image description here

Alain Matthes
  • 95,075
9

With the newer library patterns.meta there is a lot more flexibility than the old patterns library. It defines a few types of patterns, Lines, Hatch, Stars, Dots, all of which can be customized. The angle, separation, line width, size of dots/stars can be specified separately.

For example, adding the option pattern={Lines[angle=45]} to the options of a path will fill the path with diagonal lines. As usual, the braces around Lines[..] is to ensure that the parser doesn't think the ] there is the closing bracket of the options to the path itself.

A complete example.

\documentclass[border=3mm]{standalone}

\usepackage{tikz} \usetikzlibrary{patterns.meta} \begin{document} \begin{tikzpicture} \fill [ pattern={Lines[ distance=2mm, angle=45, line width=0.7mm ]}, pattern color=blue ] (0,0) rectangle (5,5); \end{tikzpicture} \end{document}

enter image description here

Torbjørn T.
  • 206,688