1

I want to draw something like the hand-drawn picture I have attached (the second picture). This is actually a portion of the line digraph of Figure 2 (with a specified orientation), which I have also attached. I realise that I need to use a few for-each loops, but I am not sure how to draw directed edges in a for-each loop. I apologise that I am not attaching any code, but I am quite stumped as to how to even begin.

Thank you in advance.

Semi circles in a row

Line graph of semi circles in a row

Emily
  • 125
  • 6

2 Answers2

2

Here is something to start with. Major steps:

  • neglecting the 
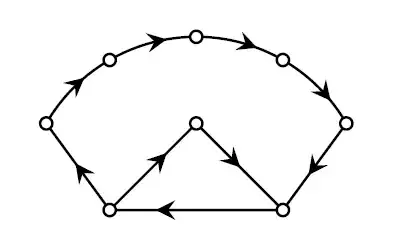
postaction, drawing the "semicircle" and the filled circles is easy enough
  • using polar coorinates makes it easy, remembering the 3 coordinates A, B and C
  • the arc takes 3 parameters after moving to its start position: (startAngle:endAngle:radius)
  • decoration is finally added using the decorations.markings lib
  • do some fine tuning on positioning them

Certainly, some code parts can further be refactored into some foreach loops.

Unfortunately I didn't succeed to move the whole drawing into a \pic. Once that works, it's easy to:

  • placing 5 of them in a row
  • accessing coordinates from inside the \pic or specifying them explicitely
  • drawing the missing few connectors

result

\documentclass[10pt,border=3mm]{standalone}
\usepackage{tikz}
\usetikzlibrary{decorations.markings}

\begin{document}

\begin{tikzpicture} [decoration={ markings, mark=between positions 0.06 and 1 step 5.3mm with {\arrow{stealth}} }] % ~~~ "semicircle" ~~~~~~~~~~ \draw [postaction={decorate}] (150:1) arc(150:30:1) -- (0:.5) coordinate (B) -- (0:-.5) coordinate (A) -- (150:1) (A) -- (90:.5) coordinate (C) -- (B) ;

% ~~~ filled circles ~~~~~~~~~~~~~~~~~~~~~~~~~~~~~~~
\draw [fill=white] (150:1) circle [radius=1pt];
\draw [fill=white] (120:1) circle [radius=1pt];
\draw [fill=white] (90:1) circle [radius=1pt];
\draw [fill=white] (60:1) circle [radius=1pt];
\draw [fill=white] (30:1) circle [radius=1pt];

\draw [fill=white] (A) circle [radius=1pt];
\draw [fill=white] (B) circle [radius=1pt];
\draw [fill=white] (C) circle [radius=1pt];

\end{tikzpicture}

\end{document}

Finally, here's the code refactoring the placement of filled circles:

\documentclass[10pt,border=3mm]{standalone}
\usepackage{tikz}
\usetikzlibrary{decorations.markings}

\begin{document}

\begin{tikzpicture} [decoration={ markings, mark=between positions 0.06 and 1 step 5.3mm with {\arrow{stealth}} }] % ~~~ "semicircle" ~~~~~~~~~~ \draw [postaction={decorate}] (150:1) arc(150:30:1) -- (0:.5) coordinate (B) -- (0:-.5) coordinate (A) -- (150:1) (A) -- (90:.5) coordinate (C) -- (B) ;

% ~~~ filled circles ~~~~~~~~~~~~~~~~~~~~~~~~~~~~~~~
%     refactored
\foreach \p in {(150:1),(120:1),(90:1),(60:1),(30:1),(A),(B),(C)}{
    \draw [fill=white] \p circle [radius=1pt];
}

\end{tikzpicture}

\end{document}

As Jasper commented, the path for the semicircles should be split at least here:

... coordinate (A) -- (150:1) (A) -- (90:.5) coordinate (C) ...

where I continued with the last 3 points for pure lazyness. Defining a second decoration style to better place the arrows there may be an option, too. It also may be a good choice to start the "semicircle" one point earlier, i.e. before the arc, i.e. at the lower left corner. Might have some beneficial consequences.


Turns out, you can split the decoration style, too; the lower left point is critical, as two pathes run through it:

result2

\documentclass[10pt,border=3mm]{standalone}
\usepackage{tikz}
\usetikzlibrary{decorations.markings}

\begin{document}

\begin{tikzpicture} [decoration={ markings, mark=between positions 0.06 and .5 step 5.3mm with {\arrow{stealth}} , mark=between positions 0.6 and .8 step 6mm with {\arrow{stealth}} ,% new mark=between positions 0.835 and 1 step 6mm with {\arrow{stealth}}% new }] % ~~~ "semicircle" ~~~~~~~~~~ \draw [postaction={decorate}] (150:1) arc(150:30:1) -- (0:.5) coordinate (B) -- (0:-.5) coordinate (A) -- (150:1) (A) -- (90:.5) coordinate (C) -- (B) ;

% ~~~ filled circles ~~~~~~~~~~~~~~~~~~~~~~~~~~~~~~~
%     refactored
\foreach \p in {(150:1),(120:1),(90:1),(60:1),(30:1),(A),(B),(C)}{
    \draw [fill=white] \p circle [radius=1pt];
}

\end{tikzpicture}

\end{document}

MS-SPO
  • 11,519
  • 1
    Looks like there is an arrow tip exactly behind the circle at the center. Maybe splitting the path or use different decorations could solve this. – Jasper Habicht May 11 '23 at 13:12
  • Yes, it's there. Splitting the path as you suggest will work fine, but also tuning starting point and separation of decoration gives some choice. – MS-SPO May 11 '23 at 14:19
  • 1
    @JasperHabicht, turned out, you can split the decoration style as well, see above after the horizontal rule. – MS-SPO May 11 '23 at 14:37
  • 1
    Thank you so much @MS-SPO! You have helped me immensely! I am so appreciative. – Emily May 15 '23 at 12:58
  • Fine :) You are free to like and accept this answer, later, unless you have/n't already. – MS-SPO May 15 '23 at 12:59
1

You could make use of \pics and then easily place and connect them.

Extending MS-SPO's nice answer:

\documentclass[border=10pt]{standalone}
\usepackage{tikz}
\usetikzlibrary{decorations.markings}

\tikzset{ pics/incomplete semicircle/.style={ code={ \tikzset{ incomplete semicircle/.cd, #1, arrow decoration outer/.style={ decoration={ markings, mark={at position 0.08 with {\arrow{stealth}}}, mark={at position 0.20 with {\arrow{stealth}}}, mark={at position 0.32 with {\arrow{stealth}}}, mark={at position 0.44 with {\arrow{stealth}}}, mark={at position 0.57 with {\arrow{stealth}}}, mark={at position 0.76 with {\arrow{stealth}}}, mark={at position 0.95 with {\arrow{stealth}}} }, postaction={decorate} }, arrow decoration inner/.style={ decoration={ markings, mark={at position 0.3 with {\arrow{stealth}}}, mark={at position 0.8 with {\arrow{stealth}}} }, postaction={decorate} } } \coordinate (-A) at (150:1); \coordinate (-B) at (120:1); \coordinate (-C) at (90:1); \coordinate (-D) at (60:1); \coordinate (-E) at (30:1); \coordinate (-F) at (0:.5); \coordinate (-G) at (90:.5); \coordinate (-H) at (0:-.5); \draw[incomplete semicircle/arrow decoration outer] (-A) arc[start angle=150, end angle=30, radius=1] -- (-F) -- (-H) -- cycle; \draw[incomplete semicircle/arrow decoration inner] (-H) -- (-G) -- (-F); \foreach \p in {A,B,...,H}{ \node[circle, draw, fill=white, inner sep=0.75pt] (-n\p) at (-\p) {}; } } }, arrowed/.style={ decoration={ markings, mark={at position 0.55 with {\arrow{stealth}}} }, postaction={decorate} } }

\begin{document}

\begin{tikzpicture} \pic (c1) at (0,0) {incomplete semicircle}; \pic (c2) at (2,0) {incomplete semicircle}; \draw[arrowed] (c1-nF) -- (c2-nH); \draw[arrowed] (c2-nA) -- (c1-nF); \end{tikzpicture}

\end{document}

enter image description here

  • Wow, thank you so much @Jasper Habicht! I am super grateful for you taking the time to assist me. – Emily May 15 '23 at 12:59
  • @Emily You should be able to add options to style the line width (and other things) as options to the \pic command, such as: \pic[line width=0.2pt] (c1) at (0,0) {incomplete semicircle};. However, 2pt will be too thick for the above picture, I think. – Jasper Habicht Jan 19 '24 at 12:32
  • Thank you, Jasper. I deleted my comment as I then was able to solve my question. For the sake of helping others, what I wanted to do is reduce the thickness of the lines for the nodes (circles) and edges (lines). What worked for me is replacing the line \draw[incomplete semicircle/arrow decoration outer] with \draw[incomplete semicircle/arrow decoration inner, thin] (so adding the argument "thin") as well as adding "thin" here too: \foreach \p in {A,B,...,H}{ \node[circle, draw, thin, fill=white, inner sep=1.2pt] (-n\p) at (-\p) {}; Thank you so much, though for your response! – Emily Jan 20 '24 at 12:09