how can i have a table in highlight background like the following? (preferably without using Tikz package)

how can i have a table in highlight background like the following? (preferably without using Tikz package)
If you only need to do this once, here's a possible solution:
\documentclass{article}
\usepackage{xcolor}
\pagestyle{empty}
\begin{document}

Content outside of the box

\begin{table}
    \colorbox{blue!20}{%
    \begin{minipage}{3.25in}%
        \stepcounter{table}
        \textbf{Table \thetable}\hspace*{1em}{\sffamily Hello World\ldots}\par
        \begin{tabular}{|c|c|c|c|c|c|}\hline
            & \multicolumn{3}{c}{Year} \\\cline{2-6}%'
             & 2006  & 2007  & 2008  & 2009  & 2010 \\\cline{2-6}
        tech & 78 nm & 68 nm & 59 nm & 52 nm &  45 nm \\\hline%'
        \end{tabular}
        \addcontentsline{lot}{table}{Hello World}
    \end{minipage}}
\end{table}

\begin{table}
\caption{Hello Moon}

\end{table}

Content outside of the box

\end{document}
I don't call caption inside the minipage. Finally, in case you're building a table of contents, you'll need something like \addcontentsline to get the table to show up. I don't work much with building table of contents. I'm not entirely sure how to get this finagled table to properly show up.

Since this seems to be something you need to repeatedly do, I created an environment.
\documentclass{article}
\usepackage{xcolor}
\pagestyle{empty}
\newsavebox{\mytablebox}
\newenvironment{mytable}[2]{%
        \begin{table}%
        \begin{lrbox}{\mytablebox}%
        \stepcounter{table}%
        \begin{minipage}{#2}%
        \textbf{Table \thetable}\hspace*{1em}{\sffamily #1}\par%
        \addcontentsline{lot}{table}{#1}%
    }
    {\end{minipage}%
     \end{lrbox}%
     \colorbox{blue!20}{\usebox{\mytablebox}}
     \end{table}}


\begin{document}

Content outside of the box

\begin{mytable}{Hello New World}{3.25in}
        \begin{tabular}{|c|c|c|c|c|c|}\hline
            & \multicolumn{3}{c}{Year} \\\cline{2-6}%'
             & 2006  & 2007  & 2008  & 2009  & 2010 \\\cline{2-6}
        tech & 78 nm & 68 nm & 59 nm & 52 nm &  45 nm \\\hline%'
        \end{tabular}
\end{mytable}

\begin{mytable}{Hello Moon}{2in}
  Contents of my table
\end{mytable}

Content outside of the box

\end{document}

In this final example, I'm calling \caption from within the environment. You may have to do some tweeking to get the caption to appear as you want. But at least this way you probably don't have to bother with \addcontentsline. Here I've reset the abovecaptionskip. This seems a bit brutal. There's probably some glue that should be stuck in there.
\documentclass{article}
\usepackage{xcolor}
\pagestyle{empty}
\newsavebox{\mytablebox}
\setlength{\abovecaptionskip}{0pt}
\newenvironment{mytable}[2]{%
        \begin{table}%
        \begin{lrbox}{\mytablebox}%
        \begin{minipage}{#2}%
        \caption{#1}%
    }
    {\end{minipage}%
     \end{lrbox}%
     \colorbox{blue!20}{\usebox{\mytablebox}}
     \end{table}}


\begin{document}

Content outside of the box

\begin{mytable}{Hello New World}{3.25in}
        \begin{tabular}{|c|c|c|c|c|c|}\hline
            & \multicolumn{3}{c}{Year} \\\cline{2-6}%'
             & 2006  & 2007  & 2008  & 2009  & 2010 \\\cline{2-6}
        tech & 78 nm & 68 nm & 59 nm & 52 nm &  45 nm \\\hline%'
        \end{tabular}
\end{mytable}

\begin{mytable}{Hello Moon}{2in}
  Contents of my table
\end{mytable}

Content outside of the box

\end{document}
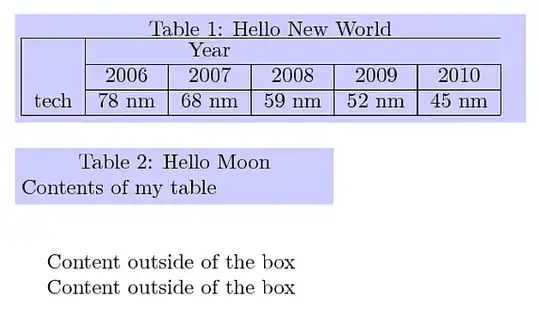
table 1 is set manually. every time we use a table, we have to define it manually; this is not resonable in a book with several tables
– smh
Dec 02 '12 at 21:24
\caption also works in minipage. Depending on the document class care might be needed for \abovecaptionskip and \belowcaptionskip.
– Heiko Oberdiek
Dec 02 '12 at 21:40
empheq package and put the equations in empheq environment without defining anything else. is it possible for tables? i mean, is there any package to put tables in it and not having to define new environment?
– smh
Dec 03 '12 at 09:24
Here's one possible solution using the standard table environment and \caption command, with automatic calculation of the appropriate dimensions for the colored background; I know that smh said "preferably without TikZ", but I couldn't find another way (the code needs at least three runs to stabilize):
\documentclass{article}
\usepackage[paperheight=44\baselineskip,paperwidth=15cm]{geometry}
\usepackage{xcolor}
\usepackage{caption}
\usepackage{booktabs}
\usepackage{tikz}
\usetikzlibrary{calc,shadings}

% Andrew Stacey's code from
% http://tex.stackexchange.com/a/50054/3954
\makeatletter
\tikzset{%
  remember picture with id/.style={%
    remember picture,
    overlay,
    save picture id=#1,
  },
  save picture id/.code={%
    \edef\pgf@temp{#1}%
    \immediate\write\pgfutil@auxout{%
      \noexpand\savepointas{\pgf@temp}{\pgfpictureid}}%
  },
  if picture id/.code args={#1#2#3}{%
    \@ifundefined{save@pt@#1}{%
      \pgfkeysalso{#3}%
    }{
      \pgfkeysalso{#2}%
    }
  }
}

\def\savepointas#1#2{%
  \expandafter\gdef\csname save@pt@#1\endcsname{#2}%
}

\def\tmk@labeldef#1,#2\@nil{%
  \def\tmk@label{#1}%
  \def\tmk@def{#2}%
}

\tikzdeclarecoordinatesystem{pic}{%
  \pgfutil@in@,{#1}%
  \ifpgfutil@in@%
    \tmk@labeldef#1\@nil
  \else
    \tmk@labeldef#1,(0pt,0pt)\@nil
  \fi
  \@ifundefined{save@pt@\tmk@label}{%
    \tikz@scan@one@point\pgfutil@firstofone\tmk@def
  }{%
  \pgfsys@getposition{\csname save@pt@\tmk@label\endcsname}\save@orig@pic%
  \pgfsys@getposition{\pgfpictureid}\save@this@pic%
  \pgf@process{\pgfpointorigin\save@this@pic}%
  \pgf@xa=\pgf@x
  \pgf@ya=\pgf@y
  \pgf@process{\pgfpointorigin\save@orig@pic}%
  \advance\pgf@x by -\pgf@xa
  \advance\pgf@y by -\pgf@ya
  }%
}
\newcommand\tikzmark[2][]{%
\tikz[remember picture with id=#2] {#1;}}
% end of Andrew's code

\newcommand{\gettikzxy}[3]{%
  \tikz@scan@one@point\pgfutil@firstofone#1\relax
  \edef#2{\the\pgf@x}%
  \edef#3{\the\pgf@y}%
}
\makeatother

\newcommand\minx{}

\newcommand\shadetable[4][blue]{%
  \begin{tikzpicture}[overlay,remember picture]%
    \gettikzxy{(pic cs:#2)}{\auxi}{\auyi}
    \gettikzxy{(pic cs:#4)}{\auxii}{\auyii}
    \edef\maxx{0pt}
    \ifdim\auxii<\auxi
      \edef\minx{\auxii}
    \else
      \edef\minx{\the\dimexpr\auxi+\tabcolsep\relax}
      \edef\maxx{\dimexpr\auxii-\auxi-\tabcolsep\relax}
    \fi
    \fill[#1,fill opacity=0.3] let \p1 = (pic cs:#4), \p2 = (pic cs:#2) in
      ( $ (\minx,\y2) + (-2\tabcolsep,3ex) $ ) rectangle
      ( $ (pic cs:#3) + (\the\dimexpr2\tabcolsep+\maxx,-2.2ex)$ );
  \end{tikzpicture}%
}%

\DeclareCaptionFormat{myformat}{\tikzmark{start\thetable}#1#2#3}
\captionsetup[table]{format=myformat}

\newcommand\ShadeTable[1][orange]{%
  \shadetable[#1]{start\thetable}{end\thetable}{inner\thetable}%
}

\newcommand\IMark{\tikzmark{inner\thetable}\hfill\mbox{}}
\newcommand\EMark{\hfill\tikzmark{end\thetable}}

\begin{document}


\begin{table}
\centering
\caption{test table}
\begin{tabular}{@{}c*{4}{c}c@{}}
\toprule
\IMark & \multicolumn{5}{c}{Year} \\
\cmidrule(r){2-2}\cmidrule(lr){3-3}\cmidrule(lr){4-4}
\cmidrule(lr){5-5}\cmidrule(l){6-6}
& 2006  & 2007  & 2008  & 2009  & 2010 \\
Tech & 78nm & 68nm & 59nm & 52nm &  45nm\EMark \\
\bottomrule
\end{tabular}
\end{table}

\ShadeTable

\begin{table}
\centering
\caption{the same test table with a middle length caption}
\begin{tabular}{@{}c*{4}{c}c@{}}
\toprule
\IMark & \multicolumn{5}{c}{Year} \\
\cmidrule(r){2-2}\cmidrule(lr){3-3}\cmidrule(lr){4-4}
\cmidrule(lr){5-5}\cmidrule(l){6-6}
& 2006  & 2007  & 2008  & 2009  & 2010 \\
Tech & 78nm & 68nm & 59nm & 52nm &  45nm\EMark \\
\bottomrule
\end{tabular}
\end{table}

\ShadeTable[red]

\begin{table}
\centering
\caption{the same test table with a long caption spanning more than one line just for a test with such captions}
\begin{tabular}{@{}c*{4}{c}c@{}}
\toprule
\IMark & \multicolumn{5}{c}{Year} \\
\cmidrule(r){2-2}\cmidrule(lr){3-3}\cmidrule(lr){4-4}
\cmidrule(lr){5-5}\cmidrule(l){6-6}
& 2006  & 2007  & 2008  & 2009  & 2010 \\
Tech & 78nm & 68nm & 59nm & 52nm &  45nm\EMark \\
\bottomrule
\end{tabular}
\end{table}

\ShadeTable[cyan!30]

\end{document}

For each table that will receive a colored background, the user has to issue \IMark as the first command right after the table format specification, and \EMark as the last command right after the last entry of the table (right before the eventual last horizontal rule). After \end{table}, the command \ShadeTable has to be issued, so the typical use will be something like
\begin{table}
\centering
\caption{the caption}
\label{tab:lab}
\begin{tabular}{<table format>}
\IMark first entry & second entry & ... \\
entry & entry & ... \\
...
entry & entry & ... & last entry\EMark
\end{tabular}
\end{table}

\ShadeTable[<color>]
The idea is to use the ubiquitous \tikzmark (in its improved version developed by Andrew Stacey).
The tricky part is to decide the width that will be used for the colored background: this width depends on both the width of the table and that of its caption, so some calculations are performed to decide which width to use (the one of the table or the one of its caption).
For these calculations three marks are used for each table; the start mark is placed automatically just before the "Table" string of the caption (the \DeclareCaptionFormat from the caption package was used for this).
\Imark and \Emark place the other two marks; and with the x-coordinates of these marks, the appropriate background width is calculated.
The code will fail if the table floats to a different page (perhaps this can be solved in an improved version).
I have some ideas so that \IMark and \EMark will be placed automatically; even \ShadeTable can be easily placed automatically (again this will be addressed if I have the time for an improved version).
I assumed that the caption will appear before the actual table (this restriction could also be lifted in an improved version); since one popular convention is to have the caption in this way (and from the OP's example, this is the case in this question), I will leave it like that in this version.