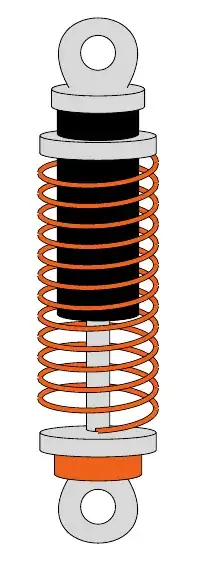
Here's a first attempt (which clearly admits improvements); basically I used superimposed cylinders and the coilup, coildown decorations provided in this answer by Hans-Peter E. Kristiansen:
\documentclass{article}
\usepackage{tikz}
\usetikzlibrary{decorations.pathmorphing,patterns,shapes.geometric}

\usepgfmodule{decorations}

\makeatletter
% coilup, coildown decorations
% code by Hans-Peter E. Kristiansen
% in https://tex.stackexchange.com/a/43605/3954
% Parameters: \pgfdecorationsegmentamplitude, \pgfdecorationsegmentlength,

\pgfdeclaredecoration{coilup}{coil}
{
  \state{coil}[switch if less than=%
    1.5\pgfdecorationsegmentlength+%
    \pgfdecorationsegmentaspect\pgfdecorationsegmentamplitude+%
    \pgfdecorationsegmentaspect\pgfdecorationsegmentamplitude to last,
               width=+\pgfdecorationsegmentlength]
  {
    \pgfpathcurveto
    {\pgfpoint@oncoil{0    }{ 0.555}{1}}
    {\pgfpoint@oncoil{0.445}{ 1    }{2}}
    {\pgfpoint@oncoil{1    }{ 1    }{3}}
    \pgfpathmoveto{\pgfpoint@oncoil{1    }{-1    }{9}}
    \pgfpathcurveto
    {\pgfpoint@oncoil{0.445}{-1    }{10}}
    {\pgfpoint@oncoil{0    }{-0.555}{11}}
    {\pgfpoint@oncoil{0    }{ 0    }{12}}
  }
  \state{last}[width=.5\pgfdecorationsegmentlength+%
    \pgfdecorationsegmentaspect\pgfdecorationsegmentamplitude+%
    \pgfdecorationsegmentaspect\pgfdecorationsegmentamplitude,next state=final]
  {
    \pgfpathcurveto
    {\pgfpoint@oncoil{0    }{ 0.555}{1}}
    {\pgfpoint@oncoil{0.445}{ 1    }{2}}
    {\pgfpoint@oncoil{1    }{ 1    }{3}}
    \pgfpathmoveto{\pgfpoint@oncoil{2    }{ 0    }{6}}
  }
  \state{final}
  {
  \pgfpathmoveto{\pgfpointdecoratedpathlast}
  }
}


% coildown decoration
%
% Parameters: \pgfdecorationsegmentamplitude, \pgfdecorationsegmentlength,

\pgfdeclaredecoration{coildown}{coil}
{
  \state{coil}[switch if less than=%
    1.5\pgfdecorationsegmentlength+%
    \pgfdecorationsegmentaspect\pgfdecorationsegmentamplitude+%
    \pgfdecorationsegmentaspect\pgfdecorationsegmentamplitude to last,
               width=+\pgfdecorationsegmentlength]
  {
    \pgfpathmoveto{\pgfpoint@oncoil{1    }{1    }{3}}
    \pgfpathcurveto
    {\pgfpoint@oncoil{1.555}{ 1    }{4}}
    {\pgfpoint@oncoil{2    }{ 0.555}{5}}
    {\pgfpoint@oncoil{2    }{ 0    }{6}}
    \pgfpathcurveto
    {\pgfpoint@oncoil{2    }{-0.555}{7}}
    {\pgfpoint@oncoil{1.555}{-1    }{8}}
    {\pgfpoint@oncoil{1    }{-1    }{9}}
  }
  \state{last}[width=.5\pgfdecorationsegmentlength+%
    \pgfdecorationsegmentaspect\pgfdecorationsegmentamplitude+%
    \pgfdecorationsegmentaspect\pgfdecorationsegmentamplitude,next state=final]
  {
    \pgfpathmoveto{\pgfpoint@oncoil{1    }{ 1    }{3}}
    \pgfpathcurveto
    {\pgfpoint@oncoil{1.555}{ 1    }{4}}
    {\pgfpoint@oncoil{2    }{ 0.555}{5}}
    {\pgfpoint@oncoil{2    }{ 0    }{6}}
  }
  \state{final}
  {
  \pgfpathlineto{\pgfpointdecoratedpathlast}
  }
}

\def\pgfpoint@oncoil#1#2#3{%
  \pgf@x=#1\pgfdecorationsegmentamplitude%
  \pgf@x=\pgfdecorationsegmentaspect\pgf@x%
  \pgf@y=#2\pgfdecorationsegmentamplitude%
  \pgf@xa=0.083333333333\pgfdecorationsegmentlength%
  \advance\pgf@x by#3\pgf@xa%
}
\makeatother

\definecolor{myorange}{RGB}{238,97,26}

\begin{document}

\begin{tikzpicture}
\draw[fill=gray!30]
  (-0.5,-0.8) .. controls (-1.4,-2.3) and (1.4,-2.3) .. (0.5,-0.8);
\draw[fill=white]
  (0,-1.3) circle (0.3cm);
\node[cylinder,
    fill=myorange,
    rotate=90,
    draw,
    minimum height=0.7cm,
    minimum width=1.5cm,
    anchor=east]
  at (0,-0.15)  {};
\node[cylinder,
    fill=gray!30,
    rotate=90,
    draw,
    minimum height=0.5cm,
    minimum width=2cm,
    anchor=east]
  at (0,0.1)  {};
\draw[decoration={
      aspect=0.3,
      segment length=3mm,
      amplitude=10mm,coilup,
      segment length=10pt},
    decorate,
    double=myorange,
    double distance=2pt]
  (0,5) -- (0,0);
\node[cylinder,
    fill=gray!30,
    rotate=90,
    draw,
    minimum height=2cm,
    minimum width=0.4cm,
    anchor=east,aspect=0.3]
  at (0,2)  {};
\node[cylinder,
    fill,
    rotate=90,
    draw,
    minimum height=3.1cm,
    minimum width=1.4cm,
    anchor=east]
  at (0,5)  {};
\draw[decoration={
      aspect=0.3,
      segment length=3mm,
      amplitude=10mm,coildown,
      segment length=10pt},
    decorate,
    double=myorange,
    double distance=2pt]
  (0,5) -- (0,0);
\node[cylinder,
    fill=gray!30,
    rotate=90,
    draw,
    minimum height=0.5cm,
    minimum width=2cm,
    anchor=east]
  at (0,5.2)  {};
\node[cylinder,
    fill,
    rotate=90,
    draw,
    minimum height=1cm,
    minimum width=1.4cm,
    anchor=east]
  at (0,6)  {};
\node[cylinder,
    fill=gray!30,
    rotate=90,
    draw,
    minimum height=0.5cm,
    minimum width=1.6cm,
    anchor=east]
  at (0,6)  {};
\draw[fill=gray!30]
  (-0.5,5.9) .. controls (-1.4,7.5) and (1.4,7.5) .. (0.5,5.9);
\draw[fill=white]
  (0,6.5) circle (0.3cm);
\end{tikzpicture}

\end{document}

TikZis very well suited for schematic drawings but not for stuff that should look like it was a photograph. – Benedikt Bauer Jan 14 '13 at 12:22