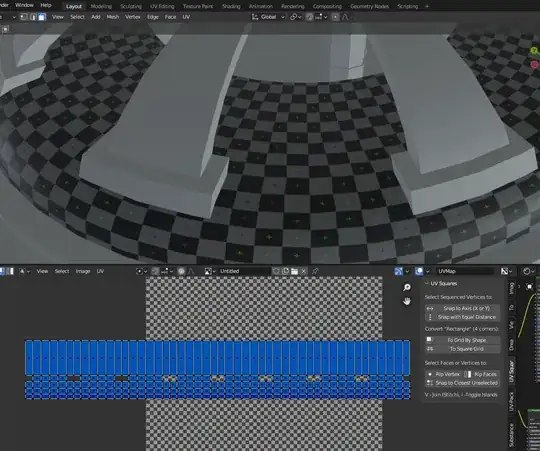
So I modeled a cylindrical thing, quads only. Unwrapped it and used uv squares addon to make a straight line from it. However it is still weirdly stretched (look at checker texture). Is it somehow fixable?
Asked
Active
Viewed 58 times
1
unnmmd
- 11
- 1
-
Hi Please use a title that reflects the content of the question. It should be descriptive but succinct, unique and identifying, summarizing the issue so that users can at a glance understand what your post is about. Use the [edit] link below your post and avoid anything not strictly essential to the post. Remember, your title is the first thing potential visitors will see, and makes your question findable for future users. See "What is the problem with posting an image or link and asking “How do I do this?"" – Duarte Farrajota Ramos May 04 '23 at 22:43
-
This is caused by triangulation of trapezoids. They are mapped to quads in the UV space, but after the triangulation the triangles are equal in UV space but not equal in the 3D space. Notice how the left and right sides of the trapezoid are clearly equal, the triangles share the diagonal that divided the trapezoid to the triangles, and yet one triangle has a shorter inner edge, and one triangle has a longer outer edge and therefore must be bigger - and yet the triangles in the UV space are equal: https://i.imgur.com/2ChQo9d.png – Markus von Broady May 04 '23 at 22:56
-
In order to have the surface of the triangles equal, you would need to bend the diagonal, but you can't bend it, unless you subdivide it to multiple edges. And that's what happens when you subdivide your object. So the solution is to subdivide your object before triangulation. Then you can bake the texture onto the low poly object so that the texture now conforms to the limitations of the uv map. – Markus von Broady May 04 '23 at 22:58
2 Answers
0
In order to fix this:
 Into this:

You need to duplicate your mesh, subdivide it (simple subdivision) and bake the texture back to the low poly. Because baking has a few noobtraps, here's a step by step guide to fix a low poly torus:
- New Blender file, delete all objects.
- ⬆ ShiftA, M, Y Add a cylinder.
- F9 change cylinder settings: 24 major segments, 8 minor segments.
- In Shading workspace add a new material:

- ⬆ ShiftA, search for Image Texture.
- Create a new image:
 .
. - Quadruple the original width for a 4096×1024 texture.
- Switch Generated Type to UV Grid.
- Connect the color socket of the Image Texture node to Emission socket of the Principled BSDF node.
- Repeat steps 5-7, but this time use solid color instead of a grid. Keep this node unconnected and ACTIVE (SELECTED).
- In the 3D viewport ⬆ ShiftD duplicate the torus. Don't move it, let it overlap the original one.
- ✲ Ctrl2 Add 2 subdivision levels.
- Go to the modifiers tab and switch subdivision algorithm from Catmull-Clark to Simple.
- In the Outliner, click on the low-poly (first, original) torus, then ⬆ Shift-click on the high-poly torus. It's important the low-poly is the active one.
- Set render engine to Cycles.
- In Render settings scroll down and find Bake settings.
- Enable Selected to Active option. Bake Type: Emit. Extrusion:
1 mm. - Hit Bake button and wait patiently.
- When the bake is done, get rid of the connected Image Texture node, and connect the remaining node to wherever you want (typically "Base Color" socket).
Markus von Broady
- 36,563
- 3
- 30
- 99
-1
could you describe more precisely how do you consider this UV map to be not ok?
depending on your needs you could:
- add UV seems to separate your mesh into more UV islands making the stretching less apparent
- just resize the whole UV mapping to fit within the image
-
I am talking about that stretching on black and white squares, you can clearly see that they are not straight, as a result my texture will be not as consistent as I want to – unnmmd May 05 '23 at 01:00
