I have an object with some animation (120 seconds) and I want to make this animation now play over the duration of 270 seconds. How can I stretch the animation to this new duration?
4 Answers
Select the object and open the Dope Sheet. Set the frame scrubber (the green line) to the starting frame, press A to select all and then press S to scale the keyframes apart up to the required frame. This should stretch the animation to whatever length you want. If you have multiple keyframes, Blender will even these out for you. You can also hold Shift when scaling to snap in small increments.

Note of course that since you are making a short animation longer, it will most likely playback slower.
- 43,379
- 12
- 156
- 189
-
slower playback is exactly what I wanted, thanks -) – retif Nov 23 '13 at 01:26
-
1When you scale you can also specify the scale amount. After pressing S type in 2.25 and press enter. 2.25 is 270/120, unfortunately while entering amounts used by operators we don't get to enter calculations like in numeric input fields. – sambler Nov 23 '13 at 14:02
-
Since Blender 2.80, entering calculations for amounts used by operators (like in numeric input fields) is possible, after you enable Default to Advanced Numeric Input in Preferences → Input. – legends2k Jan 08 '21 at 05:56
iKlsR's answer is good, but for completeness:
To do this for the entire scene you can use Time Remapping (in Properties > Render > Dimensions):
Assuming you are rendering to 24 frames per second, your 120 second animation should be 120*24 = 2880 frames long. To make it 270 seconds long, it should be 270*24 = 6480 frames long.
So:

Also see How do I animate time?
-
2This worked great for me! Note, changing the Time Mapping doesn't change the END frame. So if your original was 288 frames and you update it for 648, you will need to make sure that your END frame is updated to 648 as well. (way way way late comment. :) ) – Wing Tang Wong Oct 09 '22 at 02:04
One of the tricky things about time remapping or scaling keyframes is that any value such as an influence on a child of bone constraint that was formerly used as a switch between 2 keyframes (frame 1 influence=1, frame 2 influence=0) will now be gradual and most likely inaccurate. Say if you scale or remap by 2, then you'll have a frame in between where the influence is .5 and your object's location is wrong.
I've not found a solution, especially when using time remapping. However, using keyframe scaling you can least manually add more keyframes and adjust the influence/location.
- 11
- 1
-
The solution is to not use two keyframes with linear/bezier interpolation as a value switch. Use one keyframe for each value change, using Constant interpolation. – L0Lock Mar 11 '24 at 08:33
Adding to the Time Remapping answer, since this feature was replaced by Time Stretching in Blender 3.0 and later:
Access Time Stretching from the Output Properties panel. Set a larger New parameter to stretch, smaller to shrink. Old defaults to 100, so New is essentially a percentage.
As before, this does not change the number of frames in the animation, so adjust the End field for Frame Range as needed.
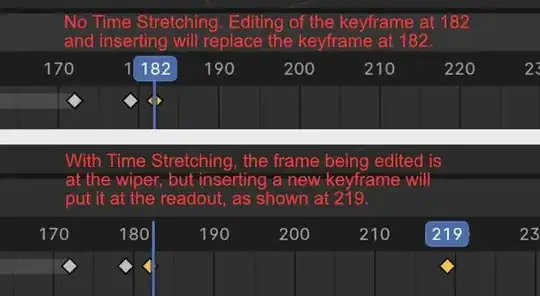
A caveat: If you need to edit keyframes, there is an unexpected behavior. I'm using Blender 4.0.2. In the animation pane, the playback wiper (blue vertical line) normally has a blue bulb at the top that displays the current frame number. However, when using Time Stretching, the wiper and the frame indicator become disconnected. This is as designed—the wiper indicates which keyframes are being hit, while the bulb displays the output frame. The problem with this is that if you need to make minor edits to keyframes, you need to position the playback so that the wiper is over the keyframe that you want to edit. So, if your stretch factor is 150, then to edit the keyframes at 100, you need to position the bulb at 150. Make the change, then save the keyframe (press I, for instance). But a new keyframe will be created at frame 150, and the keyframe at 100 is unchanged. The workaround is that you can grab and slide the new keyframe back down to 100. If not, you'll have unplanned results.
Because of this—particularly if you intend to edit the animation further, scaling in the timeline is the better solution for final changed. But Time Stretching is the better solution for temporary stretching to try out different timing values, because it's so easy to change the timing by editing a single value. You can always set it back to 100:100 and scale in the timeline once you've made your final decisions.
- 101

