9

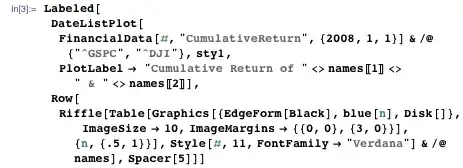
Wolfram Blog uses PNG images to display input and output cells in a notebook. For example, the following is an image from Samuel Chen's post:

enter image description here

I should be able to produce a similar image by selecting a group of cells and selecting File -> Save Selection from the pull-down menu. When I tried that on the cell

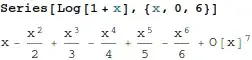
In[1]:= Series[Log[1+x],{x,0,6}]
Out[1]= x-x^2/2+x^3/3-x^4/4+x^5/5-x^6/6+O[x]^7

I get the garbled image

enter image description here

This does not happen when I save selection to PDF or BMP. In the case of BMP, the In[1] and Out[1] goes missing:

enter image description here

Do you know of a way to fix the problem with PNG export and/or include the In[1] in BMP export? I am running Mathematica 8.0.4.0 on Linux x86 (64-bit), which I think is part of the problem.

Michael Wijaya
  • 2,197
  • 16
  • 29
  • How do you know they didn't take a screenshot? – rm -rf Jun 03 '12 at 07:17
  • This works correctly for me with v7 on Win7: http://i.stack.imgur.com/dzJJ1.png – Mr.Wizard Jun 03 '12 at 07:21
  • 1
    Since I am not seeing this problem, please check your setting for "PageWidth" in the Option Inspector, especially the one for ExportMultipleCellsOptions. Mine is set for Infinity. – Mr.Wizard Jun 03 '12 at 07:26
  • @Mr.Wizard Mine is set for Infinity as well. I suspect that this is a Linux-specific problem (again). – Michael Wijaya Jun 03 '12 at 07:28
  • Can you adapt Szabolcs's image uploader to your needs? – Mr.Wizard Jun 03 '12 at 07:32
  • @R.M Wouldn't it take some work to cut out the relevant parts if we used a screen shot? – Michael Wijaya Jun 03 '12 at 07:32
  • 1
    @Mr.Wizard The image Szabolcs's uploader produces looks great: http://i.stack.imgur.com/jRg2e.png. I will look at his code. Thanks! – Michael Wijaya Jun 03 '12 at 07:38
  • Okay, I'm going to post that as an answer for now. Hopefully a direct fix will be posted by someone else. – Mr.Wizard Jun 03 '12 at 07:58
  • 2
    I ran into a similar problem when making the uploader. The system was using the palette's width to rasterize the selection, not the width of the notebook where the expression was. It's still not completely clear to me how the width is determined. You can google this site for ExportPacket and see this too for some hints. ("The front end can be unpredictable about what line width it uses to compute breaks, so it is usually wise to specify an explicit value for the PageWidth option." – Szabolcs Jun 03 '12 at 08:18
  • My computer is set up with dual monitor, and I discovered by accident that the problem described here only occurs when the notebook in question is on one of the two monitors. It will probably be too difficult to reproduce this problem, thus my vote to close. – Michael Wijaya Jun 05 '12 at 21:27
  • @Szabolcs would you consider formulating a more complete answer so that I can delete the marginal one I posted? – Mr.Wizard Jun 07 '12 at 00:41
  • Same problem here. Setting is the same too: Dual Monitor, Linux-x86-64 and Mma 8.0.4 and notebook on the second screen and the png-export fails. Btw, do you have the behavior when the doc-center is on the second monitor and you click on one of the Tutorials, See Also, ... buttons on the top of a help page. Here, the drop down menu appears on the other screen then ;-) – halirutan Sep 17 '12 at 02:30
  • @halirutan On my machine, the drop-down menu works as expected. – Michael Wijaya Sep 17 '12 at 03:45

2 Answers2

4

First, I cannot reproduce the problem by using File -> Save As..., but I have seen similar things while developing the first (now defunct) version of the image uploader.

This is not a full answer, but perhaps it'll help you fix the problem.

The first approach I tried for rasterizing parts of a notebook was something along the lines of Rasterize[NotebookSelection[]]. I discovered that if I put this into a button, and put the button into a palette, everything will be reformatted to the width of the palette for rasterization.

I used two workarounds:

  1. Copy the selection into a new hidden notebook (CreateDocument[..., Visible -> False]) and Rasterize the whole notebook. The width of the hidden notebook defines the rasterization width.

  2. Use Edit -> Copy As -> Bitmap (use it programmatically through FrontEndTokenExecute), then paste back the bitmap into a notebook for exporting. This is available only on Windows (any version) or Mac (version 9 only).

  3. There's a third possibility using ExportPacket, described in this answer and its comments. I couldn't use this in the image uploader because it only works if a complete cell is selected by clicking on the cell bracket. It can't be used if a cell is only partially selected.

You can start along these lines to fix the problem. If you get stuck, let me know, and I'll go into details.

Szabolcs
  • 234,956
  • 30
  • 623
  • 1,263
3

I just saw the question now. To add to Szabolcs' very detailed and general answer something practical, which works under Linux with Mathematica 8.0.4, let me give you code (a function from Szabolcs' image uploader), which works directly:

rasterize[maxWidth_: 650] := 
  Module[{target, selection, image}, 
   selection = NotebookRead[SelectedNotebook[]];
   If[MemberQ[Hold[{}, $Failed, NotebookRead[$Failed]], 
     selection], $Failed,(*there was nothing selected*)
    target = 
     CreateDocument[{}, WindowSelected -> False, Visible -> False, 
      WindowSize -> maxWidth];
    NotebookWrite[target, selection];
    image = Rasterize[target, "Image"];
    NotebookClose[target];
    Print[image]]];

Button["Rasterize Selection", rasterize[] &]

Basically, you can do whatever you like with the image at the end, but for simplicity, I just print it so you get it in the notebook. When you select your complete cell and press the button you get the following image

Mathematica graphics

halirutan
  • 112,764
  • 7
  • 263
  • 474