6

I use the following code to produce Lindenmayer drawings, utilizing the code from this site.

Is it possible to modify this code to colour each individual unit with a different colour, producing the last picture?

\documentclass{article}
\usepackage{tikz}
\usetikzlibrary{lindenmayersystems}
\usetikzlibrary[shadings]
\begin{document}
{
\pgfdeclarelindenmayersystem{Pntaplx}{
\rule{F -> F++F++F+++++F-F++F}
}
\foreach \k in {0,1}
{
\begin{tikzpicture}[scale=5,rotate=0]
\draw[draw=red!80!black, fill=yellow, line width=0.1cm, line cap=round, lindenmayer system={Pntaplx, axiom=F++F++F++F++F, order=\k, angle=36, step=.4cm}] lindenmayer system;
\end{tikzpicture}
}
}
\end{document}

enter image description here

enter image description here

Ingmar
  • 6,690
  • 5
  • 26
  • 47
Hany
  • 4,709
  • 2
    One of the challenges of your approach is that the small pentagons are not really separately closed paths, because the L-system just makes one long line -- albeit a line that goes back on itself and touches at the corners. So when you fill it, you can only fill the whole thing... A recursive approach might give you more flexibility. Is that any good? – Thruston Apr 30 '23 at 17:41
  • @Thruston Thank you for your explanatory comment. – Hany May 01 '23 at 04:18
  • This is a so-called Iterative Fractal System (IFS). – projetmbc May 11 '23 at 07:32

2 Answers2

9

This is not an L-system -- but it does show a recursive approach to drawing a pentaflake that allows you to play with the colouring.

enter image description here

I have used Metapost for the drawing, wrapped up in luamplib, so you need to compile it with lualatex.

\documentclass[border=5mm]{standalone}
\usepackage{luamplib}
\begin{document}
\mplibtextextlabel{enable}
\begin{mplibcode}
input colorbrewer-rgb
vardef median(expr p) = origin for i=1 upto 5: + 1/5 point i of p endfor enddef;
vardef flake(expr level, limit, p, s) = 
    if level < 1:
        fill p withcolor s;
        draw p withcolor 3/4 s;  % or omit the colour to get the default black
    else:
        save small_p, m;
        path small_p; pair m; m = median(p); 
        small_p = p shifted -m scaled 0.381966; % (phi/(phi+1+phi)) \simeq 0.381966 
        for i=1 upto 5:
            flake(level - 1, limit, small_p shifted (point i of p - point i of small_p), 
            if level = limit: Spectral[6][i] else: s fi);
        endfor
        flake(level - 1, limit, small_p rotated 180 shifted m, 
            if level = limit: Spectral 6 6 else: s fi);
    fi
enddef;
beginfig(1);
    path P; P = for i=1 upto 5: 50 up rotated 72i -- endfor cycle;
    for j=1, 2, 3:
        for i=1 upto j+1:
            picture T; 
            T = image(
                flake(j, i, P, 15/16);
                label("$(" & decimal j & "," & decimal i & ")$", 
                    point 1/2 of bbox currentpicture + 6 down);
            );
            draw T shifted (100j-100i, 110j);
        endfor
    endfor
endfig;
\end{mplibcode}
\end{document}

Notes

Most of the code in the example above is devoted to playing with the colours. For a basic pentaflake recursive procedure you could strip it back like this:

vardef flake(expr level, p) = 
    if level < 1:
        draw p;
    else:
        save small_p, m;
        path small_p; pair m; 
        m = median(p);   
        small_p = p shifted -m scaled 0.381966; % (phi/(phi+1+phi)) \simeq 0.381966 
        flake(level - 1, small_p shifted (point 0 of p - point 0 of small_p));
        flake(level - 1, small_p shifted (point 1 of p - point 1 of small_p)); 
        flake(level - 1, small_p shifted (point 2 of p - point 2 of small_p)); 
        flake(level - 1, small_p shifted (point 3 of p - point 3 of small_p)); 
        flake(level - 1, small_p shifted (point 4 of p - point 4 of small_p)); 
        flake(level - 1, small_p rotated 180 shifted m);
    fi
enddef;

The approach here is to define the routine with a level parameter and a pentagon p to draw. When the level is less than 1, just draw the path p. Otherwise, call flake again with a scaled-down and shifted copy of p -- called small_p, and with the level set to level-1. This is a nice simple way to do recursion in MP.

You could then use this routine in a complete program like this:

\documentclass[border=5mm]{standalone}
\usepackage{luamplib}
\begin{document}
\begin{mplibcode}
vardef median(expr p) = origin for i=1 upto 5: + 1/5 point i of p endfor enddef;
vardef flake(expr level, p) = 
    ... as above ...
enddef;
beginfig(1);
    path P; P = for i=1 upto 5: 100 up rotated 72i -- endfor cycle;
    flake(3, P);
endfig;
\end{mplibcode}
\end{document}

Compiling this with lualatex would produce this:

enter image description here

And you could play about with this to make variations. For example if you comment out the sixth call to flake that puts the shape in the middle, then you get this gasket instead:

enter image description here

Note that in order to get the scaling and rotation right it helps to shift the shape back to the origin, then scale it and rotate it, then shift it back to where it is wanted. And note that to get this right you can't use the built-in center command because that gives you the centre of the bounding box of the shape, not the actual median of the shape (ie the centre of the circle through the five points of the shape).

You could also put the first five calls into a loop as shown in the multicoloured example. The rest of the complexity is just dealing with the colours.

Thruston
  • 42,268
  • Thank you very much for your answer. I applied your code; and I will try to understand it. Just one comment; can the line (draw p withcolor s;) be modified to specify a particular colour instead of drawing with the fill colour, which does not show the drawing if white colour is applied? – Hany May 01 '23 at 04:52
  • 1
    yes, you could do draw p withcolor 1/2s which would give you a dark version of the fill colour. See updated drawing. – Thruston May 01 '23 at 09:46
  • @ Thruston Thank you very much for your time and effort. I will look deeper on your new code and comments. – Hany May 01 '23 at 10:41
  • @ Thruston Where the line flake(3, P) should be inserted. – Hany May 01 '23 at 11:46
  • 1
    Let me make that a bit more obvious -- you might like to follow the link at the top for introductions and tutorials and the manual... – Thruston May 01 '23 at 12:48
  • @ Thruston Thank you very very much for your time and patience. I applied your edited code, and got the result you specified. I will read the documents in the link at the top. – Hany May 01 '23 at 17:17
6

enter image description here

This was the result of my original answer. Since the OP asked if the pic element could be used in a recursive construction, see Drawing recursive polygons in Tikz, I indicate one possibility below.

enter image description here Using the recursive pic element p rec which takes three arguments: recursion step, end, angle.

enter image description here Using the recursive pic element 
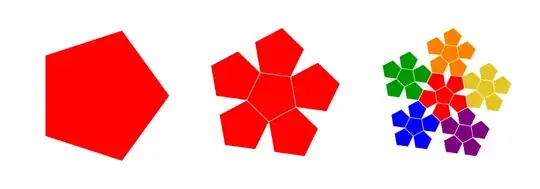
p* rec which takes three arguments: recursion step, end, angle.

enter image description here end = 3, 4, and 5 respectively

enter image description here end = 3 and color mixing = 2, 4, and 6 respectively

Remark. There are two global parameters, the radius of the initial pentagon, the degree of color mixing inside an elementary pentagon (the initial drawing corresponds to a maximal color mixing, indCM=6), and a counter, pCnt.

New version of the answer

\documentclass[11pt, border=.8cm]{article}
\usepackage{ifthen}
\usepackage{tikz}
\usetikzlibrary{calc, math}
\begin{document}

\newcounter{pCnt} \newcommand{\chooseRGB}[1]{% \ifthenelse{\equal{#1}{0}}{\colorlet{RGB}{red}}{}
\ifthenelse{\equal{#1}{1}}{\colorlet{RGB}{yellow!90!red!90!blue}}{} \ifthenelse{\equal{#1}{2}}{\colorlet{RGB}{orange}}{} \ifthenelse{\equal{#1}{3}}{\colorlet{RGB}{green!60!black}}{} \ifthenelse{\equal{#1}{4}}{\colorlet{RGB}{blue}}{} \ifthenelse{\equal{#1}{5}}{\colorlet{RGB}{violet}}{} }

\pgfkeys{/tikz/.cd, indexColorMixing/.store in=\indCM, indexColorMixing = 1 } \pgfkeys{/tikz/.cd, pentagonRadius/.store in=\pentagonR, pentagonRadius = 2 } \tikzset{ pentagons/.style={% evaluate={% real \pentagonAngle, \pentagonCst, \pentagonCstRecursion; \pentagonAngle = 72; \pentagonCst = {2cos(\pentagonAngle/2)}; \pentagonCstRecursion = {1/(1 +\pentagonCst))}; } }, pics/pentagon/.style 2 args={% code={% \draw[#1, ultra thick, fill=#2] (0: \pentagonR) \foreach \i in {1, ..., 4}{% -- (\i\pentagonAngle: \pentagonR) } -- cycle; } }, pics/p rec/.style n args={3}{% recursion step, end, angle code={% \tikzmath{ integer \i; \i = #1+1; if \i<#2 then {% \tmp = {\pentagonRpow(\pentagonCstRecursion, \i)\pentagonCst}; { \path pic {p rec={\i}{#2}{#3 +180}}; }; for \j in {0, ..., 4}{% { \path (#3 +\j\pentagonAngle: \tmp) pic {p rec={\i}{#2}{#3 +\j\pentagonAngle}}; }; }; } else {% \tmp = {\pentagonRpow(\pentagonCstRecursion, \i-1)}; {% \draw (#3: \tmp) \foreach \k in {1, ..., 4}{% -- (#3 +\k\pentagonAngle: \tmp) } -- cycle; }; }; } } }, pics/p* rec/.style n args={3}{% recursion step, end, angle code={% \tikzmath{ integer \i, \rgb; \i = #1+1; if \i<#2 then {% \tmp = {\pentagonRpow(\pentagonCstRecursion, \i)\pentagonCst}; { \path pic {p* rec={\i}{#2}{#3 +180}}; }; for \j in {0, ..., 4}{% { \path (#3 +\j\pentagonAngle: \tmp) pic {p rec={\i}{#2}{#3 +\j\pentagonAngle}}; }; }; } else {% \tmp = {\pentagonRpow(\pentagonCstRecursion, \i-1)}; \rgb = int(mod(int(\thepCnt/(7 -\indCM)), 6)); {% \chooseRGB{\rgb} \draw[white, fill=RGB] (#3: \tmp) \foreach \k in {1, ..., 4}{% -- (#3 +\k*\pentagonAngle: \tmp) } -- cycle; \stepcounter{pCnt} }; }; } } } }

\begin{tikzpicture}[pentagons, pentagonRadius=1.3, evaluate={% \t=\pentagonAngle; \d = \pentagonCst\pentagonR; \tini=30;}] \foreach \j/\rgb in {0/violet, 1/red, 2/orange, 3/green!70!black, 4/cyan!70!black}{% \path (\tini +\j\t +\t/2: \d) pic[rotate={\tini +\t/2}] {pentagon={\rgb}{\rgb!30}}; } \path (0, 0) pic[rotate=\tini] {pentagon={blue}{blue!35}}; \path (7, 0) node[scale=1.3, text width=15ex] {Elementary drawing using a {\color{blue}pic} element}; \end{tikzpicture}

\begin{tikzpicture}[pentagons, evaluate={\r=2;}] \path (0, 0) pic[blue] {p rec={0}{1}{0}}; \path (5, 0) pic[blue] {p rec={0}{2}{20}}; \path (10, 0) pic[blue] {p rec={0}{3}{-20}}; \end{tikzpicture}

\begin{tikzpicture}[pentagons] \setcounter{pCnt}{0} \path (0, 0) pic {p* rec={0}{1}{0}}; \setcounter{pCnt}{0} \path (5, 0) pic {p* rec={0}{2}{10}}; \setcounter{pCnt}{0} \path (10, 0) pic {p* rec={0}{3}{10}}; \end{tikzpicture}

\begin{tikzpicture}[pentagons] \setcounter{pCnt}{0} \path (0, 0) pic {p* rec={0}{3}{0}}; \setcounter{pCnt}{0} \path (5, 0) pic {p* rec={0}{4}{0}}; \setcounter{pCnt}{0} \path (10, 0) pic {p* rec={0}{5}{10}}; \end{tikzpicture}

\begin{tikzpicture}[pentagons] \setcounter{pCnt}{0} \path[indexColorMixing=2] (0, 0) pic {p* rec={0}{3}{0}}; \setcounter{pCnt}{0} \path[indexColorMixing=4] (5, 0) pic {p* rec={0}{3}{0}}; \setcounter{pCnt}{0} \path[indexColorMixing=6] (10, 0) pic {p* rec={0}{3}{10}}; \end{tikzpicture}

\end{document}

Original answer

One way would be to draw the pentagons directly; I tried to use a pic element and a loop. The pic element named pentagon takes two arguments, the edge color and the inner color. By default, it has a vertex on the Ox axis.

The size of the pentagons is controlled by the variable \a defined at the beginning.

The code

\documentclass[11pt, border=.8cm]{standalone}
\usepackage{tikz}
\usetikzlibrary{calc, math}
\begin{document}

\tikzmath{ real \a, \d, \t, \tini; \a = 2; % radius \t = 72; \d = {2\acos(\t/2)}; % distance between two centers \tini = -90; % initial angle } \tikzset{ pics/pentagon/.style 2 args={% code={% \draw[#1, ultra thick, fill=#2] (0: \a) \foreach \i in {1, ..., 4}{ -- (\i*\t: \a) } -- cycle; } } }

\begin{tikzpicture} \foreach \j/\rgb in {0/violet, 1/red, 2/orange, 3/green!70!black, 4/cyan!70!black}{% \path (\tini +\j*\t +\t/2: \d) pic[rotate={\t/4}] {pentagon={\rgb}{\rgb!30}}; } \path (0, 0) pic[rotate=\tini] {pentagon={blue}{blue!35}}; \end{tikzpicture}

\end{document}

Daniel N
  • 5,687
  • @ Daniel N I would like to thank you very much for your answer. I use your code to draw different kinds of polygons after editing this very useful code; when I do not need the Lindenmayer compound arrangement code by Thruston. Unfortunately the system does not allow me to accept both answers. – Hany May 05 '23 at 15:06
  • @ Daniel N If it is possible to modify your tikz-based code to build the other multiple coloured arrangement drawings shown in Thruston answer, please let me know. I will post another question requesting this. – Hany May 05 '23 at 15:13
  • Hi @Hany ! I'm glad you can use the answer. And forget about the voting system. Concerning the second question, I have to think about it; it should be a recursive construction based on putting together five "elements" around a central one at each step. Each element is constructed at the previous step... I cannot promise to have an answer quickly though; in four or five days. – Daniel N May 05 '23 at 18:43
  • @ Daniel N Thank you for your concern. I will post my question, and I will tell you its url. – Hany May 06 '23 at 04:02
  • @ Daniel N This is the link to my posted question https://tex.stackexchange.com/questions/685076/drawing-recursive-polygons-in-tikz – Hany May 08 '23 at 06:35
  • Hi @Hany. I modified my previous answer here. In your new question https://tex.stackexchange.com/questions/685076/drawing-recursive-polygons-in-tikz there is a difference between the drawings you are looking for (vertex to side contact) and @Thruston 's example your are providing (side to side contact). I tried to use my original idea based on the pic element pentagon which was pushed towards recursion. I included a color control key named indexColorMixing. – Daniel N May 11 '23 at 07:09
  • @ Daniel N I can not find the proper words to thank you enough for your kindness, time and concern. I would have chosen your answer; but this would be a vulgar behaviour since I have already chosen Thurston`s answer. I was hoping that you would have answered my posted 685076 question so that I could have chosen your answer. – Hany May 11 '23 at 07:47